Introduction:
In today’s fast-paced world, maintaining a healthy and fit body has become more than just a desire; it’s a necessity. One of the most coveted fitness goals is achieving a flat belly while effectively cutting fat. Not only does a toned midsection make you feel more confident and comfortable in your own skin, but it’s also essential for overall health. Excess abdominal fat has been linked to numerous health issues, including heart disease and diabetes.
To embark on a journey toward a slimmer and more toned midsection, you need a structured and efficient flat belly workout that focuses on cutting fat. This isn’t about crash diets or overnight transformations; it’s about adopting a sustainable fitness routine that combines targeted exercises, smart nutrition, and a commitment to long-term results.
In this guide, we will delve into the world of flat belly workouts designed to help you shed excess fat and sculpt your midsection. Whether you’re a fitness enthusiast looking to take your core training to the next level or a beginner seeking guidance on how to get started, we’ve got you covered. Get ready to discover a range of effective exercises, dietary tips, and expert advice to help you achieve the flat belly you’ve always dreamed of while improving your overall health and well-being. It’s time to say goodbye to excess belly fat and hello to a healthier, more confident you.
Lying Leg Raises
Lying leg raises are a great exercise for targeting your lower abdominal muscles and strengthening your hip flexors.

Here’s how to perform them:
1. Starting Position:
- Lie down on your back on a flat surface like a mat or a bench.
- Extend your legs fully and keep them together.
- Place your arms at your sides, palms facing down. This will help stabilize your body during the exercise.
2. Engage Your Core:
- Before you begin, engage your core muscles by pulling your navel toward your spine. This will help protect your lower back and provide stability throughout the exercise.
3. Raise Your Legs:
- Keep your legs straight and lift them off the ground, keeping them together.
- Lift your legs as high as you comfortably can while maintaining control and stability. Ideally, your legs should be perpendicular to the ground, forming a 90-degree angle with your torso.
4. Lower Your Legs:
- Slowly lower your legs back down toward the ground, but don’t let them touch the ground.
- Keep your movements controlled and deliberate. Avoid using momentum.
5. Repeat:
- Perform the desired number of repetitions. Beginners may start with 10-15 reps and gradually increase as they get stronger.
Tips:
- Keep your back flat against the floor throughout the exercise. Avoid arching your lower back.
- Breathe steadily throughout the movement. Exhale as you lift your legs and inhale as you lower them.
- If you find it difficult to keep your legs straight, you can slightly bend your knees.
- To make the exercise more challenging, you can add ankle weights or use a decline bench.
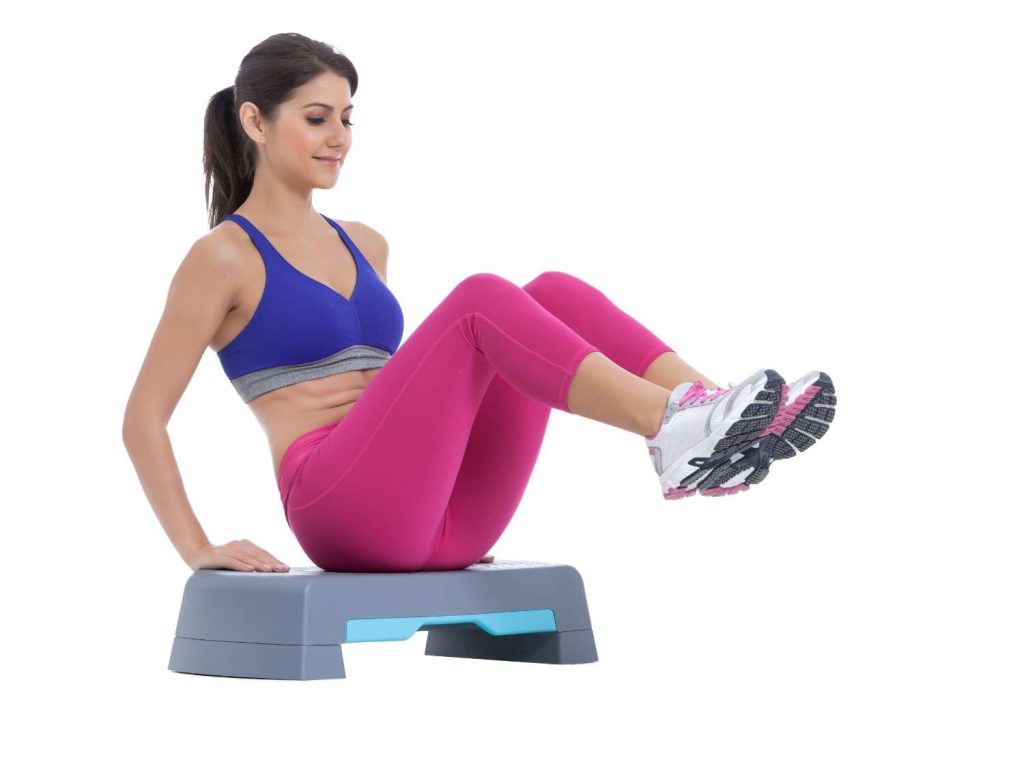
Leg In And Out
The “Leg In and Out” exercise, also known as “Leg Ins and Outs” or “Leg In-and-Outs,” is a dynamic core and lower body exercise that can help strengthen your abdominal muscles, hip flexors, and thighs.

Here’s how to do it:
1. Starting Position:
- Sit down on a mat or the floor with your knees bent and your feet flat on the ground.
- Place your hands on the ground behind you, fingers pointing away from your body. This will provide support and stability during the exercise.
- Keep your back straight and your chest up.
2. Lift Your Legs:
- Lift your feet off the ground, so your knees are bent at a 90-degree angle.
- This is your starting position.
3. Extend Your Legs:
- While keeping your upper body stable, simultaneously extend your legs straight out in front of you.
- Your legs should be hovering just above the ground.
4. Bring Your Legs Back In:
- Quickly bring your knees back to the 90-degree position, returning to the starting position.
5. Repeat:
- Continue to alternate between extending your legs and bringing them back in.
- Aim for a controlled, rhythmic motion.
- Perform the exercise for a specific number of repetitions or a set duration, depending on your fitness level and goals.
Tips:
- Engage your core muscles throughout the exercise to stabilize your upper body.
- Maintain a steady pace to keep your heart rate up and increase the intensity.
- To make this exercise more challenging, you can try to perform it without letting your feet touch the ground during the entire set.
- If you’re a beginner or have difficulty maintaining balance, you can perform this exercise while holding on to a stable surface or use a mat for added comfort.
Scissor Kicks
Scissor kicks are a popular exercise that primarily targets the lower abdominal muscles and hip flexors.
Here’s how to perform scissor kicks:
1. Starting Position:
- Lie down on your back on a flat surface, such as a mat or the floor.
- Place your hands underneath your hips or by your sides, palms facing down. This helps support your lower back and stabilize your body during the exercise.
- Keep your legs extended and your toes pointing up toward the ceiling.
2. Perform the Scissor Kicks:
- Lift your legs off the ground slightly, but keep them a few inches above the floor. This is your starting position.
- Begin the exercise by moving your legs in a scissor-like motion.
- Cross one leg over the other, lowering it toward the floor while raising the other leg toward the ceiling.
- As you lower one leg, ensure that your lower back stays in contact with the mat or floor.
- Alternate the leg positions in a controlled and rhythmic manner, creating a continuous scissor motion.
3. Maintain Control:
- Focus on keeping your core engaged and your movements slow and controlled.
- Breathe steadily throughout the exercise. Exhale as you perform the scissor motion, and inhale as you return to the starting position.
4. Repeat:
- Continue the scissor kicks for the desired number of repetitions or for a specific duration.
- Start with a manageable number of reps and sets, and gradually increase the intensity as you become more comfortable with the exercise.
Tips:
- Keep your lower back pressed into the floor to protect your spine.
- Avoid lifting your head or shoulders off the ground during the exercise; keep them relaxed on the floor.
- To make the exercise more challenging, you can raise your legs higher off the ground or use ankle weights.
- If you experience any discomfort or strain in your lower back, consider placing your hands under your hips for added support or reducing the range of motion.
Crunches
Crunches are a classic abdominal exercise that targets the rectus abdominis, commonly known as the “six-pack” muscles.

Here’s how to perform crunches with proper form:
1. Starting Position:
- Lie on your back on a mat or a comfortable, flat surface.
- Bend your knees at a 90-degree angle, keeping your feet flat on the ground. Your feet should be hip-width apart.
- Place your hands behind your head, lightly supporting your head with your fingers (avoid pulling on your head). Alternatively, you can cross your arms over your chest.
2. Engage Your Core:
- Before you begin the movement, engage your abdominal muscles by drawing your navel toward your spine. This action helps stabilize your spine and protect your lower back.
3. Perform the Crunch:
- Exhale as you lift your upper back, shoulders, and head off the ground. Keep your lower back in contact with the floor.
- Focus on using your abdominal muscles to lift your upper body, not your neck or head. Imagine bringing your ribcage toward your pelvis.
- Continue lifting until your shoulder blades are off the ground. This is the top of the crunch position.
4. Lower Back Down:
- Inhale as you slowly lower your upper body back down to the starting position.
- Keep your movement controlled and avoid letting your head slam back onto the ground.
5. Repeat:
- Perform the desired number of repetitions. Beginners might start with 10-15 reps and gradually increase the number as they become more comfortable.
Tips:
- Maintain a smooth and controlled motion throughout the exercise.
- Avoid pulling on your neck or head with your hands, as this can strain your neck muscles.
- Keep your elbows relaxed and out to the sides rather than pointing forward.
- Focus on the contraction of your abdominal muscles at the top of the movement.
- Don’t rush; prioritize proper form over the number of reps.
- To make the exercise more challenging, you can increase the number of reps, add weight (e.g., by holding a dumbbell against your chest), or incorporate variations like bicycle crunches or reverse crunches.
Bicycle Crunches
Bicycle crunches are an excellent abdominal exercise that targets not only the rectus abdominis (front of the abdomen) but also the obliques (side of the abdomen).

Here’s how to perform bicycle crunches with proper form:
1. Starting Position:
- Lie on your back on a mat or a comfortable, flat surface.
- Bend your knees at a 90-degree angle, keeping your feet flat on the ground.
- Place your hands lightly behind your head, with your fingers gently supporting your head (avoid pulling on your neck). Alternatively, you can cross your arms over your chest.
2. Engage Your Core:
- Before starting the exercise, engage your core by drawing your navel toward your spine. This will help stabilize your spine and protect your lower back.
3. Perform the Bicycle Crunch:
- Exhale as you simultaneously:
- Lift your upper back, shoulders, and head off the ground.
- Bring your right elbow toward your left knee.
- Straighten your right leg out in front of you, hovering it a few inches above the ground.
- As you do this, your left knee should bend, and your left elbow should move toward your right knee.
- Rotate your upper body to bring your right elbow and left knee as close together as possible while extending the opposite leg.
- Imagine you are pedaling a bicycle.
4. Continue Pedaling:
- Inhale as you return to the starting position with your upper back, shoulders, and head on the ground.
- As you exhale again, repeat the motion but alternate sides, bringing your left elbow toward your right knee while extending your left leg.
- Continue this pedaling motion, alternating sides with each rep.
5. Repeat:
- Perform the desired number of repetitions. You can start with 10-15 reps per side and increase as you become more comfortable.
Tips:
- Maintain a smooth and controlled motion throughout the exercise.
- Avoid pulling on your neck or head with your hands, as this can strain your neck muscles.
- Keep your elbows relaxed and out to the sides, not pointing forward.
- Focus on the contraction of your abdominal muscles and obliques as you perform each rep.
- Keep your lower back in contact with the ground throughout the movement.
- To make the exercise more challenging, you can increase the number of reps, add weight, or perform the exercise more slowly to emphasize muscle engagement.
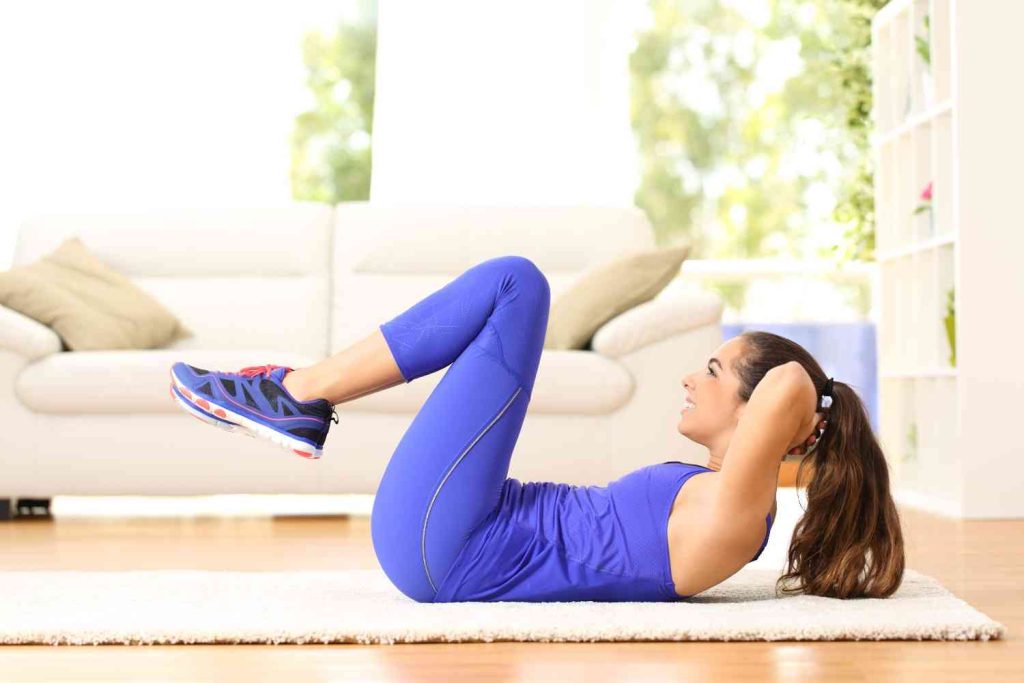
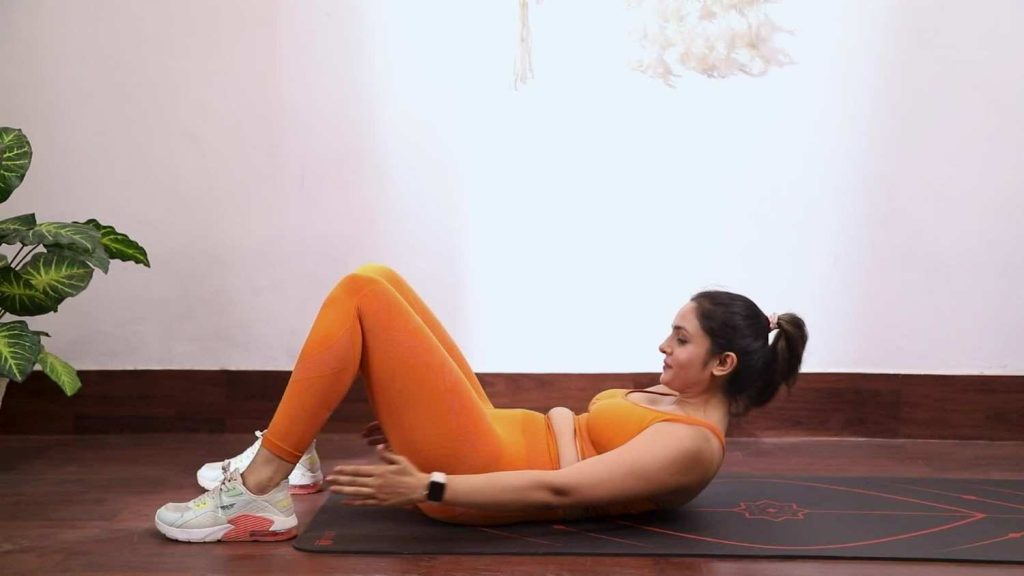
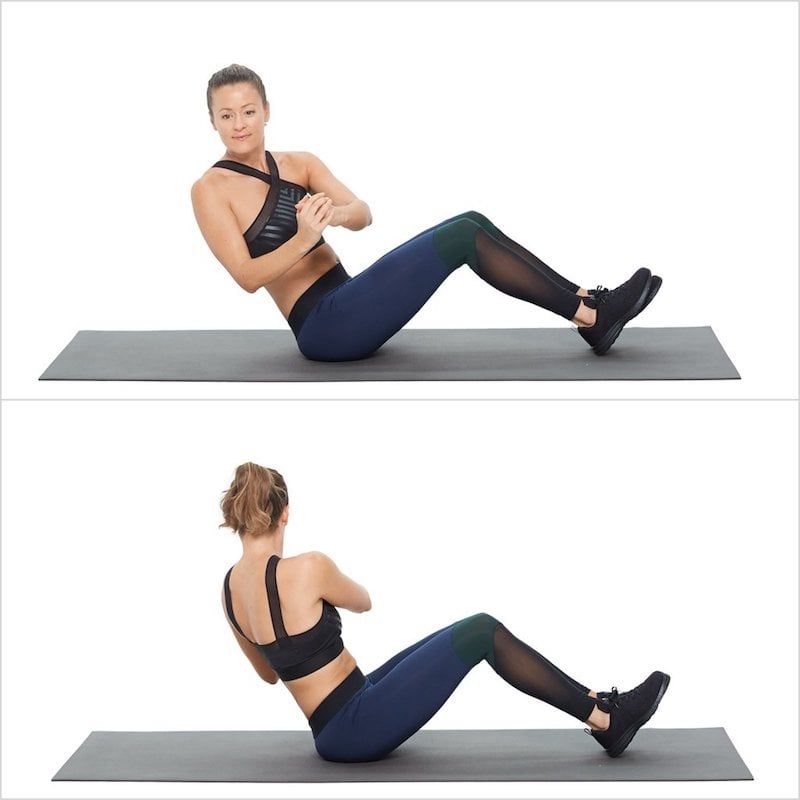
Half Seated Reverse Crunch
The half-seated reverse crunch is a variation of the traditional reverse crunch exercise that primarily targets the lower abdominal muscles. It’s an effective way to strengthen the lower abs and improve core stability.
Here’s how to perform the half-seated reverse crunch:
1. Starting Position:
- Sit on a mat or flat surface with your knees bent and your feet flat on the ground.
- Place your hands on the mat beside your hips, fingers pointing forward, for support.
- Lean back slightly, balancing on your sit bones, so your upper body is at about a 45-degree angle with the floor.
2. Engage Your Core:
- Before you begin the movement, engage your core by drawing your navel toward your spine. This helps stabilize your spine and protect your lower back.
3. Perform the Half-Seated Reverse Crunch:
- Exhale as you lift your knees toward your chest while simultaneously curling your pelvis upward.
- Keep your feet together throughout the movement.
- Aim to bring your knees as close to your chest as possible, lifting your hips off the ground.
- Hold the contracted position for a moment, feeling the engagement of your lower abs.
4. Lower Your Legs:
- Inhale as you slowly lower your knees back down to the starting position. Keep your feet off the ground, hovering a few inches above it.
- Maintain control throughout the descent, and avoid letting your feet touch the floor.
5. Repeat:
- Perform the desired number of repetitions. Start with 10-15 reps and increase as you become more comfortable.
Tips:
- Focus on using your lower abdominal muscles to initiate the movement.
- Keep your upper body relatively stationary during the exercise.
- Avoid using momentum; perform the movement in a controlled manner.
- Breathe steadily throughout the exercise. Exhale as you lift your knees, and inhale as you lower them.
- To make the exercise more challenging, you can increase the number of reps or add ankle weights.
- If you experience discomfort or strain in your lower back, consider reducing the range of motion or consulting a fitness professional for modifications.
Sit-ups
Sit-ups are a classic abdominal exercise that primarily targets the rectus abdominis, the muscle responsible for the “six-pack” appearance in the abdomen.

Here’s how to perform a basic sit-up with proper form:
1. Starting Position:
- Lie on your back on a mat or a comfortable, flat surface.
- Bend your knees at a 90-degree angle, keeping your feet flat on the ground. Your feet should be hip-width apart.
- Place your hands behind your head, with your fingers gently supporting your head (avoid pulling on your neck). Alternatively, you can cross your arms over your chest.
2. Engage Your Core:
- Before starting the exercise, engage your core by drawing your navel toward your spine. This helps stabilize your spine and protect your lower back.
3. Perform the Sit-Up:
- Exhale as you lift your upper back, shoulders, and head off the ground. Keep your lower back in contact with the floor.
- Focus on using your abdominal muscles to lift your upper body, not your neck or head. Imagine bringing your ribcage toward your pelvis.
- Continue lifting until your chest is as close to your thighs as you comfortably can.
4. Lower Back Down:
- Inhale as you slowly lower your upper body back down to the starting position.
- Keep your movement controlled and avoid letting your head slam back onto the ground.
5. Repeat:
- Perform the desired number of repetitions. Beginners might start with 10-15 reps and gradually increase the number as they become more comfortable.
Tips:
- Maintain a smooth and controlled motion throughout the exercise.
- Avoid pulling on your neck or head with your hands, as this can strain your neck muscles.
- Keep your elbows relaxed and out to the sides, not pointing forward.
- Focus on the contraction of your abdominal muscles at the top of the movement.
- Don’t rush; prioritize proper form over the number of reps.
- To make the exercise more challenging, you can increase the number of reps, add weight, or incorporate variations like twisting sit-ups or decline sit-ups.
Heel Touch
Heel touches are an effective abdominal exercise that targets the obliques, the muscles on the sides of your waist.
Here’s how to perform heel touches with proper form:
1. Starting Position:
- Lie on your back on a mat or a comfortable, flat surface.
- Bend your knees at a 90-degree angle, keeping your feet flat on the ground. Your feet should be hip-width apart.
- Place your arms at your sides, palms facing down. Your arms should be extended along the sides of your body.
2. Engage Your Core:
- Before starting the exercise, engage your core by drawing your navel toward your spine. This helps stabilize your spine and protect your lower back.
3. Perform the Heel Touch:
- Exhale as you lift your upper back, shoulders, and head off the ground. Keep your lower back in contact with the floor.
- Focus on using your oblique muscles to twist your upper body.
- Reach your right hand toward your right heel, touching it if possible, while keeping your left shoulder on the ground.
- Return to the starting position.
4. Repeat on the Other Side:
- Inhale as you lower your upper body back down to the starting position.
- Exhale again as you reach your left hand toward your left heel, touching it if possible, while keeping your right shoulder on the ground.
- Return to the starting position.
5. Continue Alternating:
- Alternate between touching your right and left heels, focusing on contracting your oblique muscles.
- Perform the desired number of repetitions. Start with 10-15 reps per side and gradually increase as you become more comfortable.
Tips:
- Maintain a smooth and controlled motion throughout the exercise.
- Avoid pulling on your neck or head with your hands, as this can strain your neck muscles.
- Keep your elbows relaxed and in line with your shoulders, not pointing forward.
- Focus on the contraction of your oblique muscles as you perform each rep.
- Keep your lower back in contact with the ground throughout the movement.
- To make the exercise more challenging, you can increase the number of reps or incorporate variations like Russian twists or seated bicycle crunches.
Jackknife Crunch
The jackknife crunch is an advanced abdominal exercise that targets both the upper and lower abdominals while engaging the hip flexors and lower back muscles.
Here’s how to perform a jackknife crunch with proper form:
1. Starting Position:
- Lie down on your back on a mat or a comfortable, flat surface.
- Extend your legs fully and keep them together.
- Place your arms straight overhead, in line with your ears, palms facing down.
2. Engage Your Core:
- Before you begin the exercise, engage your core by drawing your navel toward your spine. This helps stabilize your spine and protect your lower back.
3. Perform the Jackknife Crunch:
- Exhale as you simultaneously:
- Lift your upper body and legs off the ground.
- Bring your hands and feet toward each other in a coordinated motion.
- Aim to touch your toes or come as close as possible while keeping your legs straight.
- Your body will resemble a V shape at the top of the movement.
4. Lower Back Down:
- Inhale as you slowly lower your upper body and legs back down to the starting position.
- Keep your movement controlled and avoid letting your back arch excessively as you descend.
5. Repeat:
- Perform the desired number of repetitions. Because jackknife crunches are challenging, you may want to start with a lower number of reps, such as 8-10, and gradually increase as you become more comfortable.
Tips:
- Maintain a smooth and controlled motion throughout the exercise.
- Avoid pulling on your neck or head with your hands, as this can strain your neck muscles.
- Focus on using your abdominal muscles and hip flexors to lift your upper body and legs.
- Keep your legs straight throughout the movement.
- Keep your lower back in contact with the ground when lowering down.
- To make the exercise more challenging, you can increase the number of reps, add ankle weights, or use an exercise ball.
Russian Twist
The Russian twist is a core-strengthening exercise that primarily targets the oblique muscles but also engages the rectus abdominis (front of the abdomen), hip flexors, and lower back muscles. It’s typically performed with a weight or an object to increase the intensity.
Here’s how to do the Russian twist with proper form:
1. Starting Position:
- Sit down on a mat or a comfortable, flat surface.
- Bend your knees and place your feet flat on the ground.
- Lean back slightly, balancing on your sit bones, so your upper body is at about a 45-degree angle with the floor.
- Keep your back straight, chest up, and shoulders relaxed.
- Hold a weight or any suitable object with both hands close to your chest, or if you prefer, you can clasp your hands together.
2. Engage Your Core:
- Before you begin the exercise, engage your core by drawing your navel toward your spine. This helps stabilize your spine and protect your lower back.
3. Perform the Russian Twist:
- Exhale as you rotate your torso to the right, bringing the weight or object next to your right hip.
- Keep your arms close to your body as you twist, avoiding any excessive forward or backward movement.
- Inhale as you return to the center, keeping your feet and hips still.
4. Repeat on the Other Side:
- Exhale again as you rotate your torso to the left, bringing the weight or object next to your left hip.
- Keep your core engaged throughout the movement, and avoid hunching your back or slouching your shoulders.
- Inhale as you return to the center.
5. Continue Alternating:
- Alternate between twisting to the right and left sides, focusing on contracting your oblique muscles with each twist.
- Perform the desired number of repetitions. Start with 10-15 reps per side and gradually increase as you become more comfortable.
Tips:
- Maintain a smooth and controlled motion throughout the exercise.
- Keep your feet and hips on the ground throughout the movement; only your upper body should rotate.
- Avoid swinging or using momentum to twist. Focus on the engagement of your core muscles.
- If you’re a beginner, you can perform the exercise without weight or with a light object until you build strength and stability.
- To make the exercise more challenging, you can increase the weight, elevate your feet off the ground, or extend your legs fully.
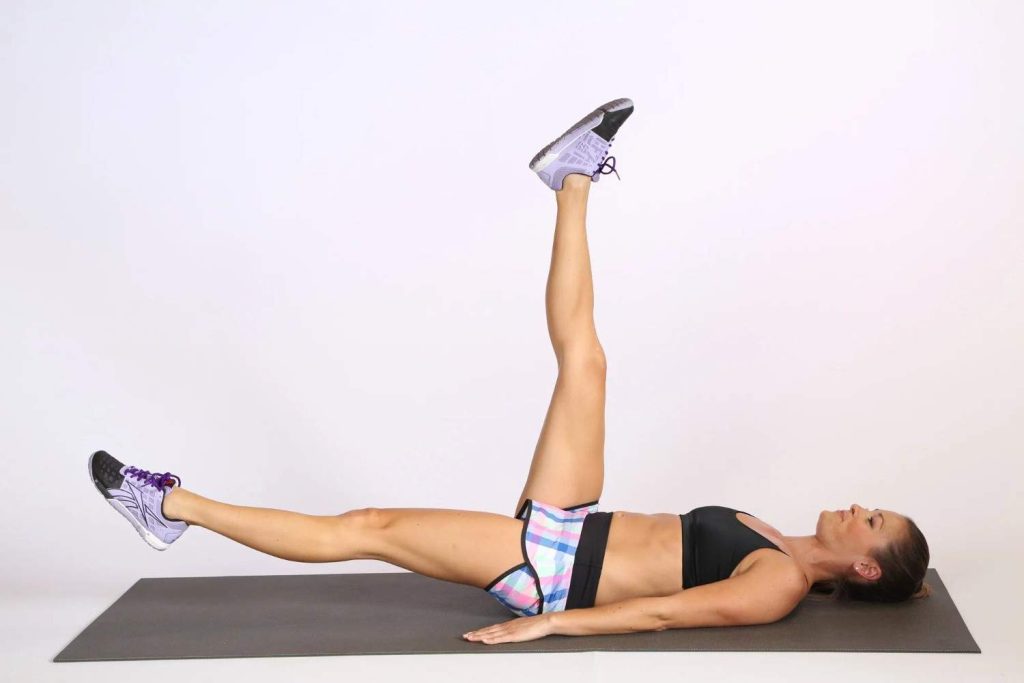
Lying Alternate Toe Taps
Lying alternate toe taps are a core exercise that targets the lower abdominal muscles.

Here’s how to perform this exercise with proper form:
1. Starting Position:
- Lie on your back on a mat or a comfortable, flat surface.
- Extend your legs fully, keeping them together.
- Place your arms at your sides, palms facing down. This will help stabilize your body during the exercise.
2. Engage Your Core:
- Before you begin the movement, engage your core by drawing your navel toward your spine. This will help protect your lower back and provide stability throughout the exercise.
3. Perform the Toe Taps:
- Exhale as you lift your legs off the ground, keeping them straight.
- While keeping your core engaged and your lower back flat on the mat, lower your right leg toward the ground, allowing it to hover just above the floor. Your left leg should remain lifted.
- Inhale as you return your right leg to the starting position.
- Exhale again as you lower your left leg toward the ground, allowing it to hover above the floor while keeping your right leg lifted.
- Inhale as you return your left leg to the starting position.
4. Continue Alternating:
- Alternate between lowering your right and left legs while keeping the other leg lifted.
- Maintain a controlled and rhythmic motion throughout the exercise, and focus on engaging your lower abdominal muscles.
5. Repeat:
- Perform the desired number of repetitions. Beginners can start with 10-15 reps per leg and gradually increase as they get stronger.
Tips:
- Keep your lower back flat against the mat throughout the exercise to protect your spine.
- Avoid arching your lower back or lifting your head and shoulders off the ground.
- Breathe steadily throughout the movement. Exhale as you lower your leg and inhale as you return it to the starting position.
- To make the exercise more challenging, you can add ankle weights or increase the number of repetitions.
- If you find it difficult to keep your legs straight, you can slightly bend your knees.
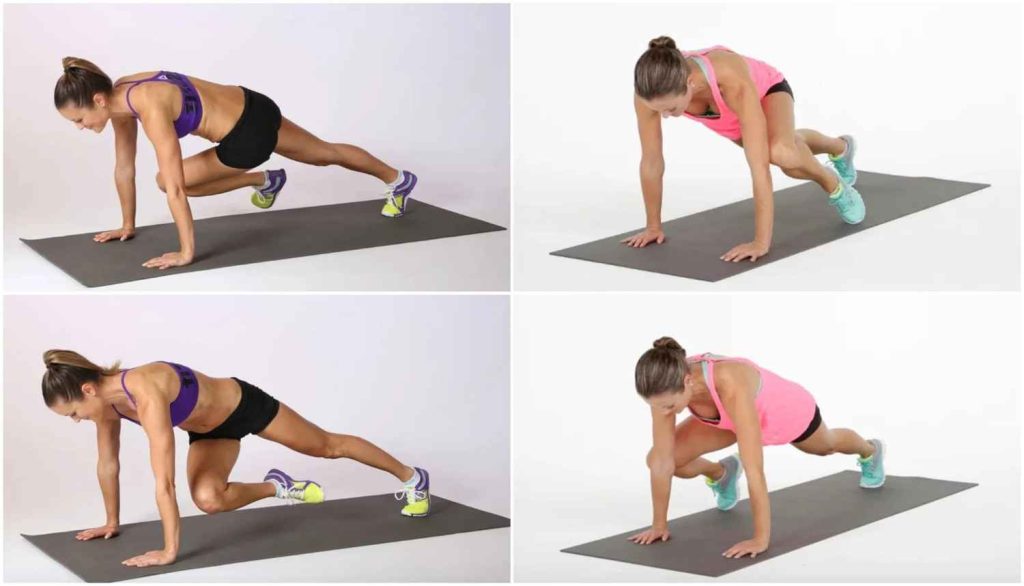
Crossbody Mountain Climbers
Crossbody mountain climbers are a dynamic and effective exercise that works the core, shoulders, and hip flexors while also increasing cardiovascular fitness.
Here’s how to perform crossbody mountain climbers with proper form:
1. Starting Position:
- Begin in a high plank position, which is similar to the top of a push-up.
- Place your hands on the floor directly under your shoulders, fingers pointing forward.
- Keep your body in a straight line from your head to your heels, engaging your core muscles.
- Your feet should be hip-width apart.
2. Engage Your Core:
- Before you start moving, engage your core by drawing your navel toward your spine. This will help stabilize your spine and protect your lower back.
3. Perform the Crossbody Mountain Climbers:
- Begin by bringing your right knee toward your left elbow, crossing your body diagonally under your torso.
- As you bring your knee in, you can lift your hips slightly and round your upper back to help facilitate the movement.
- Return your right foot to the starting position in the high plank.
- Now, bring your left knee toward your right elbow, again crossing your body diagonally under your torso.
- Continue to alternate between bringing your right knee to the left elbow and your left knee to the right elbow in a fluid, alternating motion.
4. Maintain a Rhythmic Pace:
- Perform the exercise at a controlled and steady pace, almost as if you’re running in place horizontally.
- Continue the movement for the desired number of repetitions or a set duration.
Tips:
- Keep your hands firmly planted on the ground to maintain stability.
- Maintain a strong and stable core throughout the exercise.
- Keep your hips level with your shoulders, avoiding excessive twisting or tilting.
- Focus on your breathing. Exhale as you bring your knee to the opposite elbow and inhale as you return to the plank position.
- Start with a manageable pace and increase the speed as you become more comfortable.
- To make the exercise more challenging, you can increase the speed or elevate your hands on an exercise step or box, increasing the range of motion.
Burpees
Burpees are a full-body, high-intensity exercise that combines elements of strength, cardiovascular conditioning, and agility. They are a popular exercise for improving overall fitness and burning calories.

Here’s how to perform a basic burpee:
1. Starting Position:
- Begin in a standing position with your feet hip-width apart.
- Your arms should be at your sides.
2. Squat and Place Your Hands on the Floor:
- Drop into a squat position by bending your knees and pushing your hips back.
- Place your hands on the floor in front of you, just outside your feet. Your hands should be shoulder-width apart.
3. Kick Back Into a Plank Position:
- Quickly kick both of your feet back, one at a time, into a plank position. You should be in a high plank with your body in a straight line from head to heels.
4. Perform a Push-Up (Optional):
- If you want to add an extra challenge, you can perform a push-up at this point. Lower your chest to the floor by bending your elbows, then push back up to the plank position.
5. Jump Your Feet Forward:
- Jump both of your feet back toward your hands, returning to the squat position.
6. Explosive Jump:
- From the squat position, explode upward by jumping into the air.
- As you jump, extend your arms overhead.
7. Land and Repeat:
- Land softly on the balls of your feet and immediately go into another repetition by transitioning back into the squat position.
Tips:
- Maintain a controlled and smooth motion throughout the exercise.
- Keep your core engaged to stabilize your spine and protect your lower back.
- Land softly when jumping to reduce the impact on your joints.
- Beginners can modify the exercise by stepping back and forth instead of jumping and omitting the push-up.
- Burpees can be physically demanding, so it’s essential to start at a pace and intensity level that matches your fitness level.
- Start with a manageable number of repetitions (e.g., 5-10) and gradually increase as you build strength and stamina.
- Burpees can be part of a high-intensity interval training (HIIT) routine or incorporated into various workout programs.
Plank
The plank is a fundamental core-strengthening exercise that also engages various other muscle groups in your body fat. It’s simple to perform and highly effective.

Here’s how to do a basic plank with proper form:
1. Starting Position:
- Begin by getting into a push-up position, with your hands on the ground directly beneath your shoulders.
- Your arms should be extended fully, and your fingers should be spread apart for stability.
- Your body should form a straight line from head to heels.
- Keep your feet hip-width apart.
2. Engage Your Core:
- Before you start the exercise, engage your core muscles by drawing your navel toward your spine.
- This will help stabilize your spine and prevent your lower back from sagging.
3. Maintain Proper Alignment:
- Keep your body in a straight line from head to heels throughout the exercise.
- Avoid lifting your hips too high or letting them sag too low. Aim for a neutral spine position.
- Squeeze your glutes and thighs to maintain this alignment.
4. Hold the Plank:
- Hold this position for as long as you can, while keeping proper form.
- Start with a goal of 20-30 seconds and gradually increase your hold time as you build strength.
5. Breathe Steadily:
- Focus on your breathing. Inhale and exhale in a controlled manner.
- Try to avoid holding your breath, which can lead to muscle tension.
6. Release:
- When you’re ready to end the plank, gently lower your knees to the ground and sit back on your heels to relax.
Tips:
- Keep your head in a neutral position, looking down at the floor, to maintain proper alignment and reduce strain on your neck.
- If you find it challenging to hold a full plank position initially, you can start with a modified version by placing your forearms on the ground instead of your hands.
- As you progress, you can make the plank more challenging by adding variations like side planks, plank leg lifts, or plank rotations.
- Focus on quality over quantity. It’s more important to maintain proper form than to hold the plank for an extended period, especially when you’re starting.
- Incorporate planks into your regular workout routine to build core strength and improve stability.
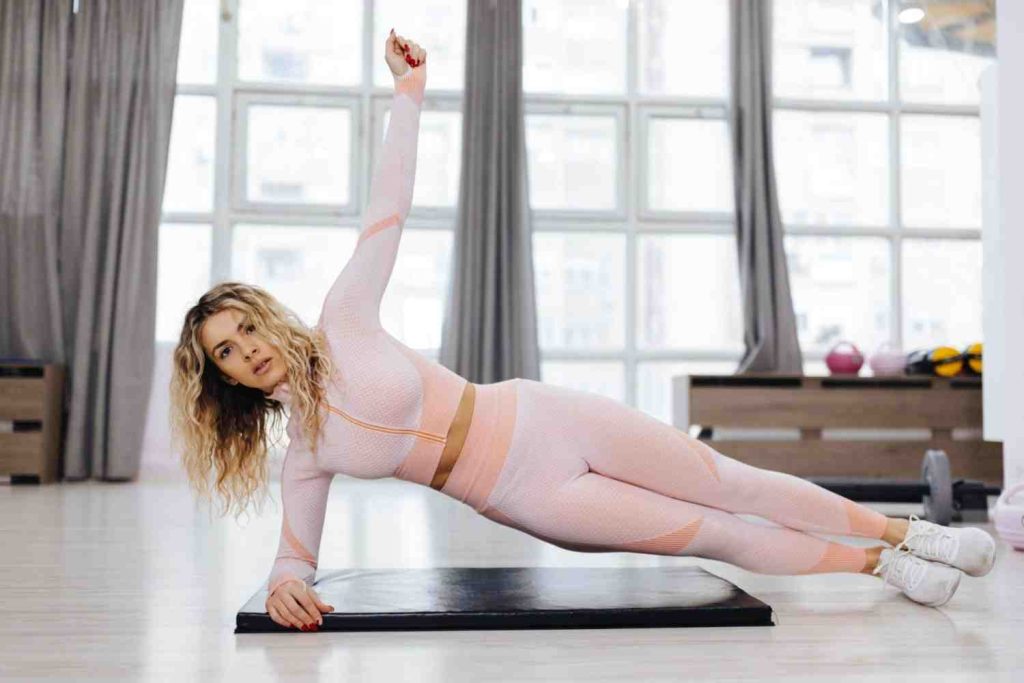
Side Plank
The side plank is a core-strengthening exercise that targets the obliques, and the muscles on the sides of your waist to burn fat. It also engages the muscles in your shoulders, hips, and legs to maintain balance and stability.
Here’s how to perform a basic side plank with proper form:
1. Starting Position:
- Begin by lying on your side on a mat or a comfortable, flat surface.
- Position your elbow directly under your shoulder, with your forearm flat on the ground.
- Stack your feet on top of each other or stagger them if you prefer more stability.
- Your body should form a straight line from head to heels.
- Keep your legs extended fully, with your feet flexed.
2. Engage Your Core:
- Before you start the exercise, engage your core by drawing your navel toward your spine. This will help stabilize your spine and protect your lower back.
3. Lift Your Hips:
- Exhale as you lift your hips off the ground, using your oblique muscles to support your body weight.
- Your body should form a straight line from head to heels in a side plank position.
- Keep your elbow directly beneath your shoulder for support.
- Focus on maintaining a stable, straight line without letting your hips sag or push too far upward.
4. Hold the Side Plank:
- Hold this position for as long as you can while maintaining proper form.
- Start with a goal of 20-30 seconds and gradually increase your hold time as you build strength.
5. Release:
- When you’re ready to end the side plank, gently lower your hips back down to the ground.
6. Repeat on the Other Side:
- To work both sides evenly, flip over and perform the side plank on your opposite side.
Tips:
- Keep your head in a neutral position, looking straight ahead, to maintain proper alignment and reduce strain on your neck.
- Focus on breathing steadily throughout the exercise. Inhale and exhale in a controlled manner.
- If you find it challenging to hold a full side plank initially, you can start with a modified version by bending your bottom knee and supporting yourself on your knee and forearm.
- As you progress, you can make the side plank more challenging by lifting your top leg or adding a lateral leg lift.
- Incorporate side planks into your regular workout routine to strengthen your obliques, improve core stability, and develop better posture.
Balance Diet
A balanced diet plays a crucial role in helping to reduce a flat belly and achieve a trimmer waistline. While it’s important to note that spot reduction (losing fat from a specific area) isn’t generally effective, a balanced diet can contribute to overall fat loss, including the abdominal area.

Here’s how:
Caloric Control:
A balanced diet helps you control your calorie intake. Weight loss, including fat loss, occurs when you consume fewer calories than you expend. Excess calories are stored as fat, often in the abdominal area. By maintaining a balance between calories in and calories out, you create a caloric deficit necessary for fat loss.
Nutrient-Dense Foods:
A balanced diet emphasizes nutrient-dense foods like fruits, vegetables, lean proteins, and whole grains. These foods provide essential vitamins, minerals, fiber, and antioxidants that support overall health and facilitate fat loss. Fiber, in particular, aids in digestion and can help prevent bloating and constipation, which can make your belly appear larger.
Reduced Processed Foods:
Processed foods, especially those high in refined sugars and unhealthy fats, can lead to weight gain and increased belly fat. A balanced diet limits these processed foods, reducing the intake of empty calories that contribute to abdominal obesity.
Protein for Satiety:
Including adequate protein in your diet helps you feel full and satisfied. It also supports muscle preservation during weight loss, which is essential for a toned appearance. Lean protein sources like chicken, fish, tofu, and legumes should be part of a balanced diet.
Healthy Fats:
Healthy fats, such as those found in avocados, nuts, and olive oil, are an essential component of a balanced diet. These fat provide satiety and support various bodily functions. They can also help control cravings for unhealthy snacks, which can lead to weight gain.
Balanced Macronutrients:
A balanced diet ensures that you get an appropriate balance of carbohydrates, proteins, and fats. This balance helps regulate blood sugar levels and prevents excessive insulin production, which can lead to fat storage, especially around the abdomen.
Hydration:
Staying properly hydrated is vital for overall health and can also help reduce bloating. Drinking enough water supports digestion and flushes out excess sodium, which can lead to water retention and puffy belly fat.
Portion Control:
A balanced diet encourages portion control. Overeating, even healthy foods, can lead to weight gain. Monitoring portion sizes helps you manage calorie intake, preventing excess fat storage.
Reduced Salt Intake:
Excessive salt consumption can lead to water retention and bloating. A balanced diet typically contains lower levels of sodium, reducing the risk of abdominal bloating.
Long-Term Sustainability:
One of the most critical aspects of a balanced diet is that it can be sustained over the long term. Crash diets or extreme restrictions are often short-lived and can lead to weight cycling, where you lose and regain weight. A balanced diet is more likely to lead to sustainable weight loss, including a reduction in belly fat.