
Welcome to our Lower Ab Workout guide, where we’ll discuss essential factors to consider before you embark on your fitness journey. Building strong and defined lower abs requires dedication and the right approach. Understanding these key elements will help you maximize your efforts and achieve the best results while ensuring your safety and well-being.
Whether you’re new to fitness or looking to enhance your routine, our expert tips will guide you toward success. Get ready to lay the groundwork for a successful lower ab workout and uncover the path to a stronger, more confident you. Let’s dive in and start this transformative journey!
In this article, I’m going to point you in the right direction for the most successful Lower Ab Workout and how you can cut your path to success in half.
The first thing you need to understand is that you can do all the Lower Ab Workout in the world, but if you have a Hugh layer of fat covering your abs what’s the point? You will never see your abs when you are carrying too much body fat.
Typically men will want to be around or below 10% body fat to really see those abs pop out and women will want to be around 15%.
Before you get into the 3 best Lower Ab Workout, you need to make your diet priority number one, otherwise, you might as well not even try to do these exercises.
While you are working on your diet, doing these Lower Ab Workout will help strengthen your core and tone your lower ab muscles while you are getting your body fat percentage to the numbers I mentioned above.
A Note on Workout Equipment for Lower Ab Workout
When it comes to targeting your lower abs during your workouts, there are several pieces of equipment that can be beneficial. It’s important to note that spot reduction, or specifically targeting fat loss in a particular area, is not possible. However, you can strengthen and tone your lower abdominal muscles with targeted exercises.

Best Lower Ab Workout For A Strong Core
Bicycle Crunch
Bicycle crunches are a great exercise for working your core muscles, including yours. The bicycle crunch is a highly effective abdominal exercise that targets multiple muscle groups in your core.
As you do bicycle crunches, make sure to keep your back pressed into the floor and your neck in a neutral position. You should also avoid using momentum to lift your upper body. Instead, focus on using your core muscles to do the work.
Here’s how to perform the bicycle crunch correctly:
- Lie flat on your back on a mat or the floor, and place your hands lightly behind your head, elbows pointing outwards.
- Lift your legs off the ground and bend your knees at a 90-degree angle, with your thighs perpendicular to the floor. This is your starting position.
- As you exhale, engage your core muscles and lift your head, neck, and shoulders off the ground. Simultaneously, bring your right knee towards your chest while straightening your left leg, keeping it a few inches off the ground.
- Twist your torso to bring your left elbow towards your right knee, making sure to maintain the contraction in your abs.
- In a controlled motion, switch sides by extending your right leg and pulling your left knee towards your chest. At the same time, twist your torso to bring your right elbow towards your left knee.
- Continue this pedaling motion, alternating your knees and elbows, while keeping your core engaged throughout the exercise.
Pro tips for performing the bicycle crunch effectively and safely:
- Focus on quality over quantity: It’s better to perform slow and controlled repetitions with proper form than to rush through the exercise.
- Engage your core: Maintain a strong contraction in your abdominal muscles throughout the movement to maximize the effectiveness of the exercise.
- Avoid pulling on your neck: Your hands are there to support your head, but you should not be using your arms to pull your head forward. Instead, focus on lifting with your core.
- Breathe properly: Exhale as you lift your head, neck, and shoulders off the ground, and inhale as you return to the starting position. Consistent breathing helps maintain proper form and core engagement.
- Start with a comfortable range of motion: If you’re new to the bicycle crunch or have limited flexibility, start with smaller movements until you feel more comfortable. Gradually increase your range of motion as you gain strength and flexibility.
Incorporating the bicycle crunch into your regular core workout routine can help strengthen and tone your abdominal muscles, improve core stability, and enhance overall athleticism. Remember to listen to your body, start at your fitness level, and gradually increase intensity and repetitions as you progress.
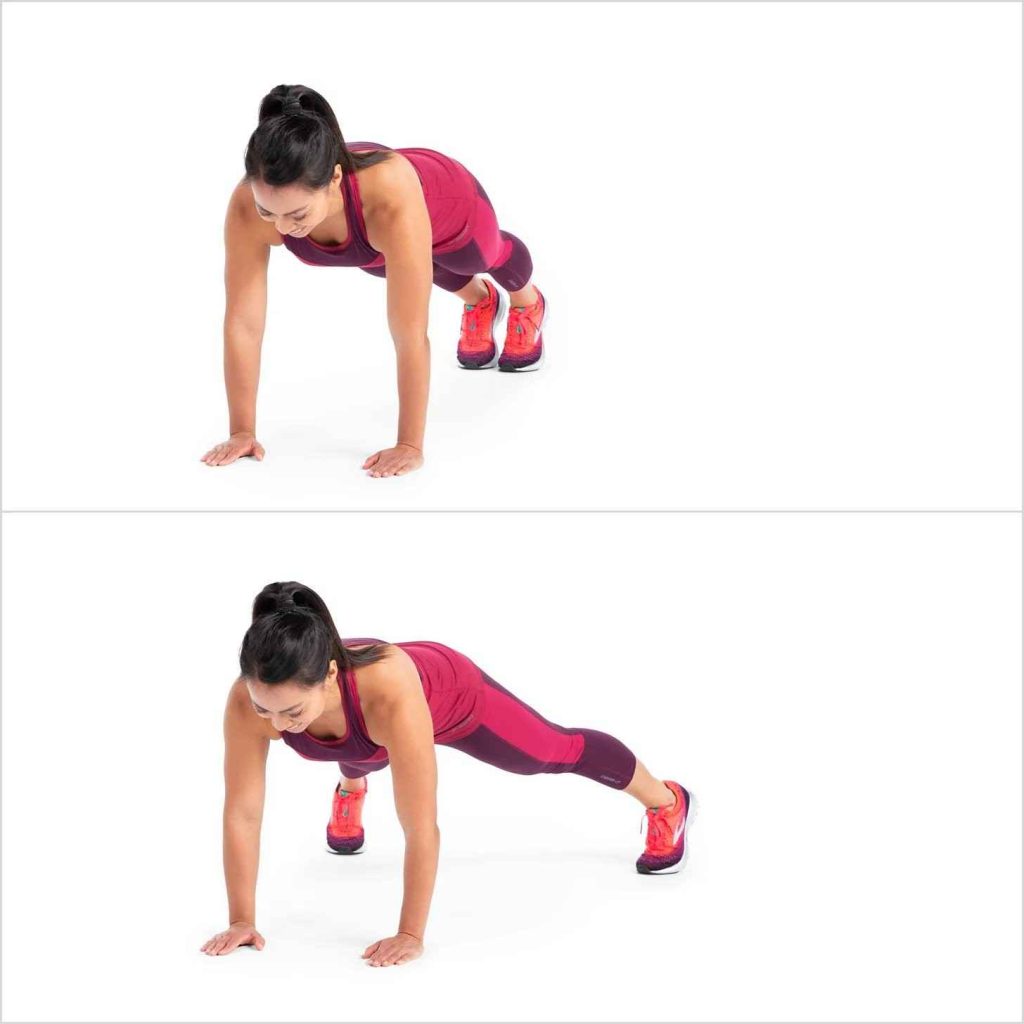
Mountain climbers
Mountain climbers are a compound exercise that primarily targets the muscles of the core, including the Lower Ab Workout. While they may not specifically “burn” the lower abs as a fat-burning exercise, they can help strengthen and tone the muscles in that area.
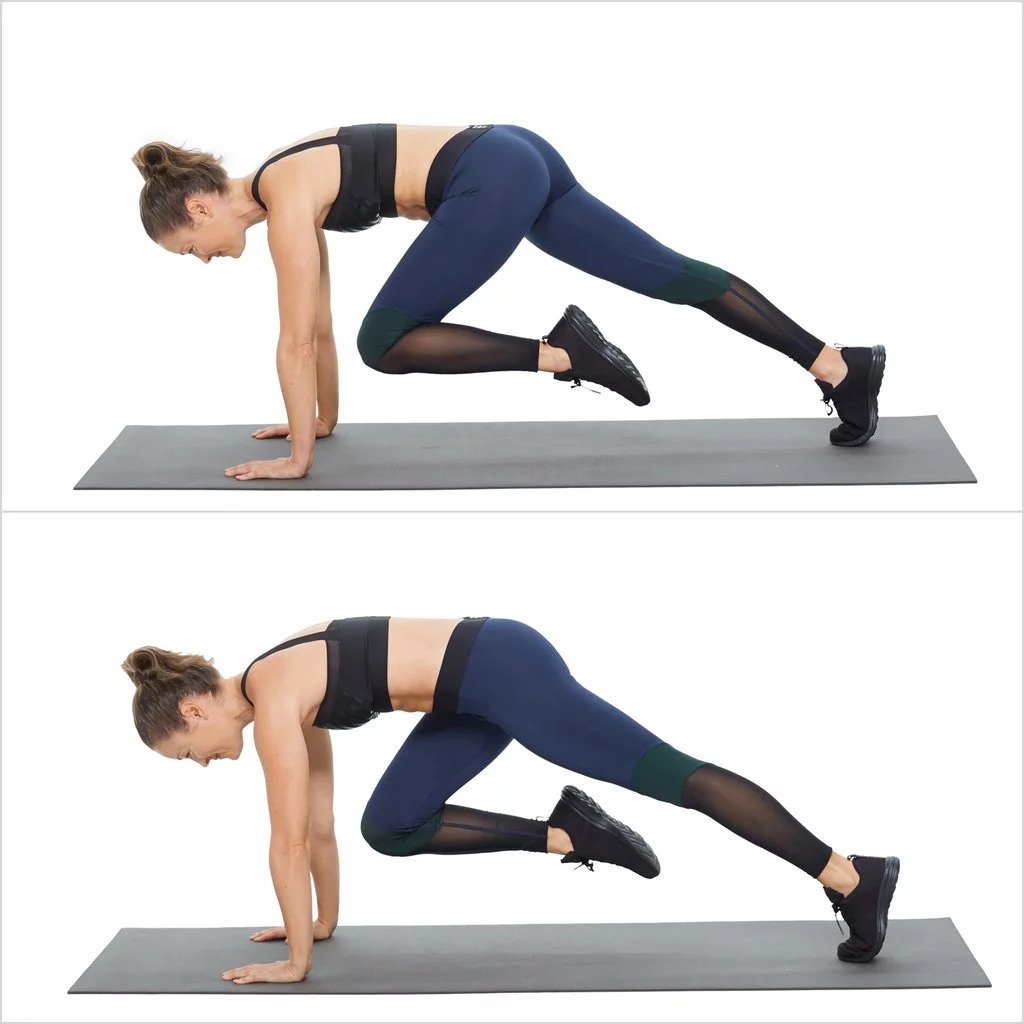
Mountain climbers are a great exercise for building cardiovascular endurance, core strength, and leg power.
Here’s a step-by-step guide on how to do mountain climbers:
Start in a high plank position:
Begin by getting into a push-up position with your hands shoulder-width apart on the floor and your body forming a straight line from your head to your heels.
Engage your core:
Make sure your core muscles are engaged by tightening your abs and squeezing your glutes. This will help maintain a stable and aligned body position throughout the exercise.
Lift one leg:
Lift your right foot off the ground and flex your knee, bringing it towards your chest. Your right foot should be off the floor, and your right knee should be positioned close to your right hand.
Alternate legs:
Quickly switch leg positions by extending your right leg back to the starting position while simultaneously bending your left knee and bringing it towards your left hand. Your left foot should be off the floor, and your left knee should be positioned close to your left hand.
Maintain a quick pace:
Continue alternating legs in a fluid and rapid motion, as if you were running in a horizontal position. Aim to maintain a fast pace while keeping your core engaged and your body in a straight line.
Breathe steadily:
Breathe deeply and rhythmically throughout the exercise. Inhale and exhale in a controlled manner to support your effort and maintain a steady flow of oxygen to your muscles.
Aim for a specific duration or repetitions:
You can perform mountain climbers for a set duration (e.g., 30 seconds, 1 minute) or a specific number of repetitions (e.g., 10, 20). Start with a duration or rep range that challenges you but is manageable based on your fitness level.
Once you’ve completed your desired duration or repetitions, rest for a short period and then repeat the exercise for additional sets.
Rest and repeat:
Remember to listen to your body and adjust the intensity as needed. If you’re new to mountain climbers, start with a slower pace and gradually increase your speed as you become more comfortable with the exercise.
Flutter kicks
Flutter kicks are a type of exercise that targets the abdominal muscles, specifically the lower ab. It involves lying on your back with your legs extended and performing a continuous kicking motion, similar to the fluttering motion of a swimmer’s kick. The primary focus of flutter kicks is to engage and strengthen the lower abdominal muscles, including the rectus abdominis and the transverse abdominis.

This exercise can help improve core stability, increase lower abdominal strength, and contribute to a toned and defined midsection. Flutter kicks can be performed on the floor or with added resistance using equipment like an exercise ball or ankle weights.
Here’s a step-by-step guide on how to do flutter kicks:
Lie down on your back:
Start by lying flat on your back on an exercise mat or a comfortable surface. Extend your legs fully and place your arms by your sides, palms facing down. This is your starting position.
Engage your core:
Activate your core muscles by gently pressing your lower back into the ground/mat. This helps maintain stability and protects your lower back during the exercise.
Lift your legs off the ground:
Keeping your legs straight and together, lift them a few inches off the ground. Ensure that your legs are extended fully and your feet are flexed.
Begin the fluttering motion:
While keeping your core engaged, alternately move your legs up and down in a small, rapid fluttering motion. Each leg should be moving independently, and the movement should originate from your hips. Imagine your legs as fins or flippers moving back and forth.
Control your breathing:
Take deep breaths in and exhale slowly and steadily as you perform the flutter kicks. Focus on maintaining a steady rhythm of breathing throughout the exercise.
Find your pace and duration:
Flutter kicks can be performed for a specific duration (e.g., 30 seconds, 1 minute) or a certain number of repetitions. Start with a duration or rep range that challenges you but is manageable based on your fitness level.
Maintain proper form:
As you perform the flutter kicks, be mindful of your form. Avoid arching your back or lifting your shoulders off the ground. Your upper body should remain relaxed and stable while your legs continue to flutter.
Rest and repeat:
Once you’ve completed your desired duration or repetitions, lower your legs back down to the starting position. Rest for a short period, and if desired, repeat the exercise for additional sets.
Remember to start with a pace and intensity that suits your fitness level and gradually increase as you become more comfortable and stronger. If you experience any discomfort or strain in your lower back, modify the range of motion or consult with a fitness professional for guidance.
Plank pikes
Plank pikes are a variation of the plank exercise that works your core, chest, shoulders, hamstrings, and calves. To do a plank pike, start in a standard plank position with your forearms on the ground and your body in a straight line from your head to your heels. Keeping your core engaged, raise your hips up and back until your body forms an inverted V-shape. Hold for a few seconds, then lower back down to the starting position.

Here’s a step-by-step guide on how to do plank pikes:
Start in a high plank position:
Begin by getting into a plank position with your hands directly under your shoulders and your body forming a straight line from your head to your heels. Your feet should be hip-width apart.
Engage your core:
Activate your core muscles by tightening your ab and squeezing your glutes. This will help maintain a stable and aligned body position throughout the exercise.
Lift your hips:
While keeping your legs straight, lift your hips up towards the ceiling, forming an inverted V shape with your body. Focus on contracting your abdominals and using your core strength to lift your hips.
Keep your shoulders stable:
As you lift your hips, be sure to keep your shoulders stable and avoid any excessive rounding or collapsing in your upper body. Your shoulders should remain in line with your wrists.
Pause briefly:
Once you’ve reached the top of the pike position, hold for a brief moment to feel the contraction in your core muscles.
Lower your hips:
Slowly lower your hips back down to the starting plank position, returning to a straight body alignment.
Maintain control and stability:
Throughout the exercise, aim to maintain control and stability in your movements. Avoid any jerking or swinging motions and focus on engaging your core muscles to perform the exercise with proper form.
Repeat for desired repetitions or duration:
Perform plank pikes for a specific number of repetitions (e.g., 8-10 reps) or a duration (e.g., 30 seconds, 1 minute). Start with a manageable challenge based on your fitness level and gradually increase as you get stronger.
Rest and repeat:
After completing the desired number of repetitions or duration, rest briefly and, if desired, repeat the exercise for additional sets.
Remember to breathe steadily throughout the exercise and listen to your body. If you experience any pain or discomfort, modify the range of motion or seek guidance from a fitness professional.
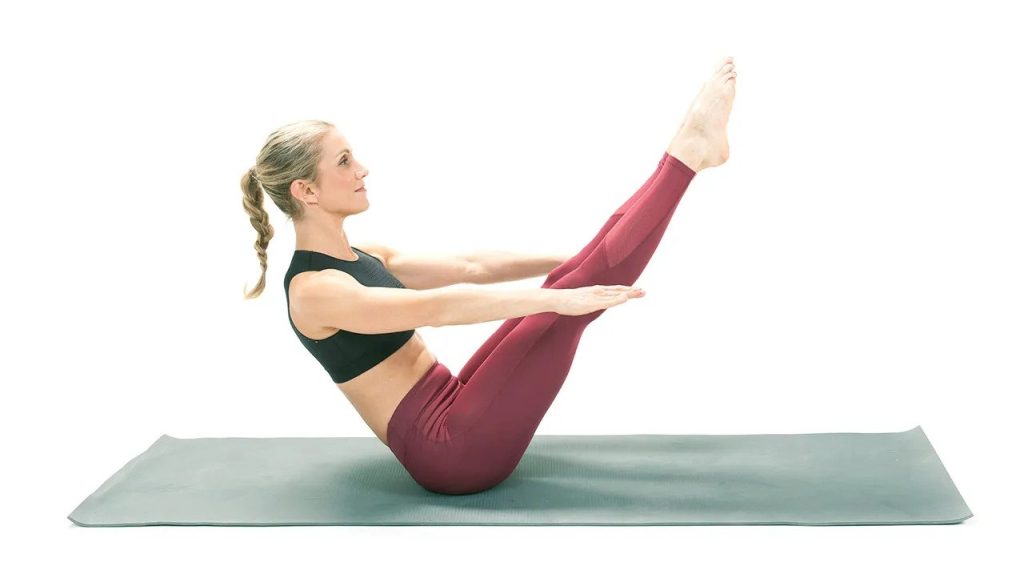
Boat pose
Boat pose, also known as Navasana or Paripurna Navasana, is a seated yoga pose that strengthens the core, back, and hip flexors. To do a boat pose, start by sitting on the floor with your legs extended in front of you. Bend your knees and place your hands behind your thighs, with your fingers pointing towards your heels.
Engage your core and lift your feet off the ground, keeping your knees bent. Straighten your legs as much as you can, while keeping your back straight and your core engaged. Hold the pose for a few breaths, then lower your feet back to the ground.
Here’s a step-by-step guide on how to do Boat pose:
Start seated on the mat:
Sit on a yoga mat with your legs extended in front of you. Keep your spine tall and your shoulders relaxed.
Bend your knees and lift your feet off the ground:
Slowly bend your knees, and then lift your feet off the ground. Balance your sitting bones while keeping your spine straight. Your lower legs should be parallel to the floor.
Find your balance:
Reach your arms forward, parallel to the floor, with your palms facing each other. This will help you find balance and engage your core muscles.
Straighten your legs:
If you’re comfortable, gradually straighten your legs while maintaining balance on your sitting bones. Your body will form a V-shape, with your torso and legs forming a 45-degree angle.
Engage your core:
Focus on engaging your core muscles by drawing your navel towards your spine. This will help stabilize your body and maintain the posture.
Relax your shoulders:
Keep your shoulders relaxed and away from your ears. Maintain an open chest and an upright posture throughout the pose.
Hold the position:
Stay in the boat pose for a few breaths, gradually working your way up to holding it for 30 seconds to 1 minute. If you’re a beginner, start with shorter durations and gradually increase as you build strength.
Modify as needed:
If straightening both legs is challenging, you can keep your knees bent and work on gradually extending them as you gain strength and flexibility.
Release the pose:
To release the pose, gently lower your feet back to the ground and extend your legs in front of you. Take a moment to rest and relax before moving on to the next pose or activity.
Remember to breathe deeply and evenly throughout the pose, maintaining a calm and relaxed state. If you experience any discomfort or strain, modify the pose or seek guidance from a qualified yoga instructor.
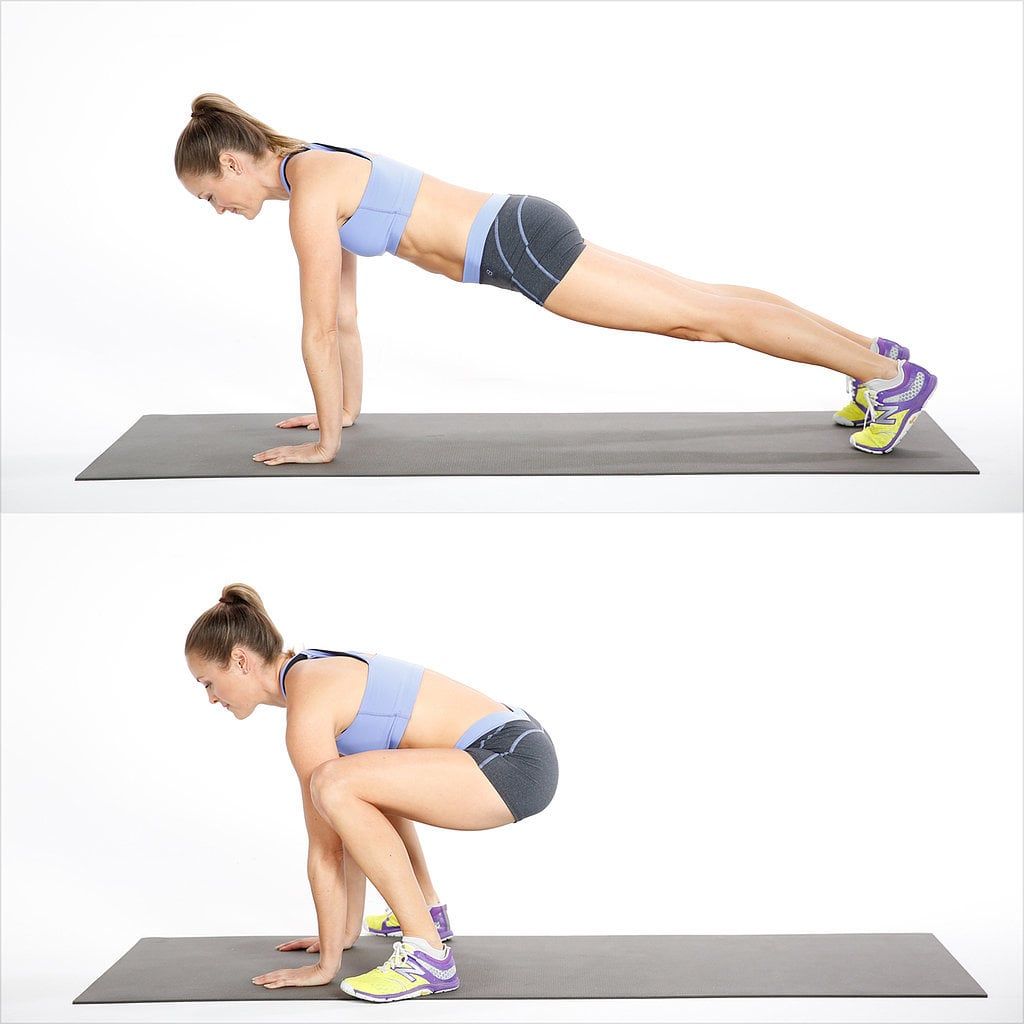
Froggers with gliders
Froggers with gliders is a variation of the frogger exercise that uses gliding discs to add resistance. The exercise works your core, chest, shoulders, triceps, glutes, and hamstrings.
Froggers with Gliders is an exercise that combines the movements of frog jumps with the use of gliding discs or sliders. It is a dynamic and challenging exercise that targets multiple muscle groups, particularly the lower body, core, and shoulders.
Here’s a step-by-step guide on how to do Froggers with gliders:
Start in a plank position:
Begin by getting into a high plank position with your hands directly under your shoulders and your body forming a straight line from your head to your heels. Place gliders or small towels under your feet.
Engage your core:
Activate your core muscles by tightening your ab and squeezing your glutes. This will help maintain stability and alignment throughout the exercise.
Bring your knees towards your elbows:
Engaging your core, drawing both knees in towards your elbows, bending your knees, and keeping your feet together. This movement resembles a frog preparing to jump.
Extend your legs back:
While keeping your core engaged, push your feet back and extend your legs fully behind you, returning to the plank position. This motion mimics a frog jumping back.
Glide your feet forward:
Using the gliders or towels under your feet, smoothly glide your feet forward, bringing your knees back towards your elbows. Imagine your legs as if they’re jumping forward like a frog.
Repeat the motion:
Continue alternating between extending your legs back to the plank position and gliding your feet forward toward your elbows. Maintain fluid and controlled motion throughout the exercise.
Breathe steadily:
Inhale as you extend your legs back, and exhale as you glide your feet forward. Maintain a steady rhythm of breathing to support your effort and maintain a good flow of oxygen to your muscles.
Aim for a specific duration or repetitions:
You can perform Froggers with gliders for a set duration (e.g., 30 seconds, 1 minute) or a specific number of repetitions (e.g., 10, 15). Start with a duration or rep range that challenges you but is manageable based on your fitness level.
Rest and repeat:
Once you’ve completed your desired duration or repetitions, rest for a short period and then repeat the exercise for additional sets.
As with any exercise, it’s important to listen to your body, maintain proper form, and adjust the intensity as needed. If you don’t have gliders, you can use small towels or perform the exercise on a smooth surface that allows for sliding motions.
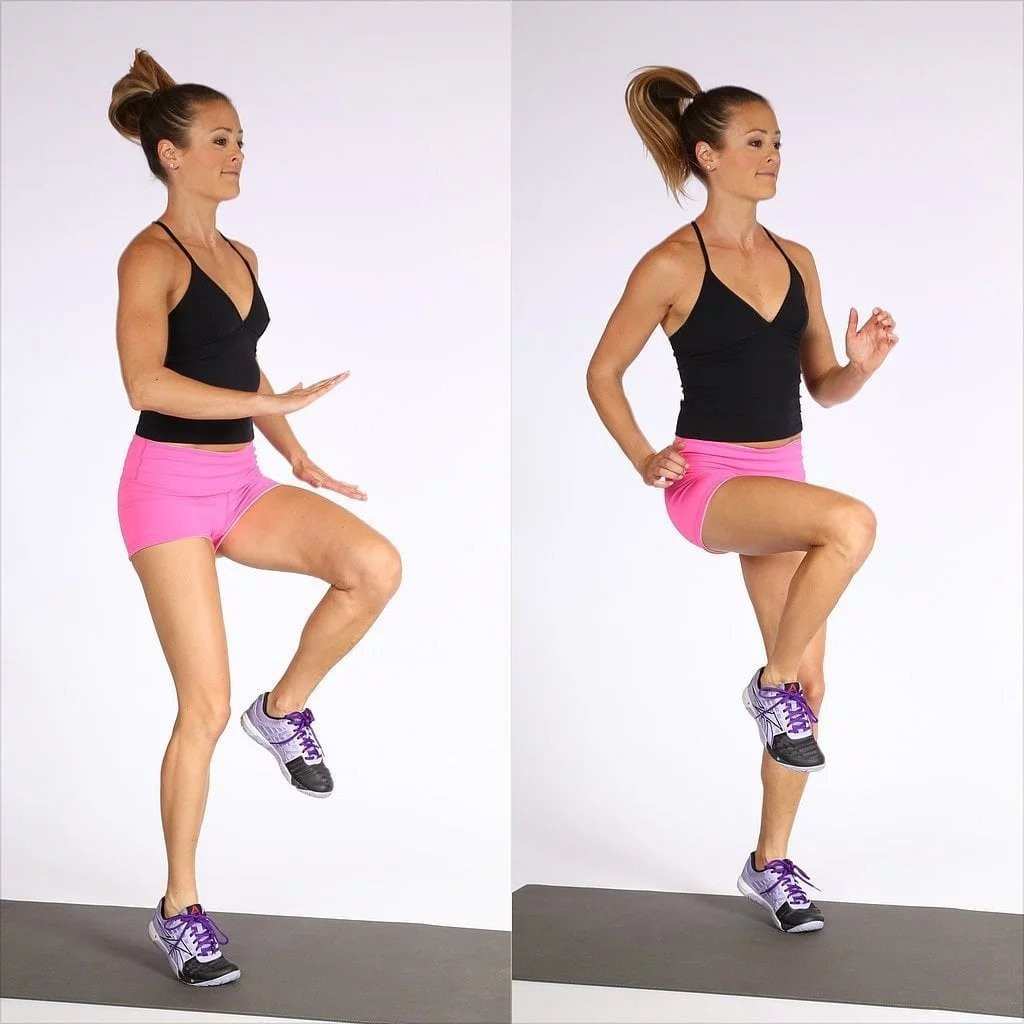
High knees
The high knee is a cardiovascular exercise that involves running in place while lifting the knees as high as possible with each stride. It is commonly used in warm-up routines or as a part of aerobic workouts to increase heart rate, improve coordination, and engage multiple muscle groups.
High knees are a great way to elevate your heart rate, increase stamina, and improve lower body strength and flexibility. They can be incorporated into various workouts, such as circuit training, interval training, or as a standalone exercise for a quick burst of cardio activity.
Here’s a step-by-step guide on how to do high knees:
Stand tall:
Begin by standing upright with your feet hip-width apart. Keep your shoulders relaxed and your arms hanging loosely by your sides.
Engage your core:
Activate your core muscles by gently pulling your belly button toward your spine. This will help you maintain stability and control throughout the exercise.
Start jogging in place:
Begin by jogging in place, lifting your knees as high as possible while maintaining a quick pace. Your arms should also move in sync with your legs, with your elbows bent at approximately 90 degrees.
Focus on knee height:
As you jog in place, concentrate on lifting your knees high towards your chest. The higher you lift your knees, the more intense the exercise becomes and the greater the engagement of your lower ab and hip flexor muscles.
Land softly:
As you lift one knee, quickly switch to the other leg by bringing the opposite knee up. Land softly on the balls of your feet to reduce impact and minimize stress on your joints.
Maintain an upright posture:
Keep your upper body straight and your gaze forward. Avoid leaning backward or hunching over as you perform the exercise.
Increase speed and intensity:
Once you’ve established a comfortable rhythm, gradually increase the speed and intensity of your high knees. Challenge yourself to maintain a quick pace while still lifting your knees as high as possible.
Breathe rhythmically:
Breathe deeply and evenly throughout the exercise. Inhale through your nose and exhale through your mouth to maintain a steady flow of oxygen to your muscles.
Aim for a specific duration or repetitions:
You can perform high knees for a set duration (e.g., 30 seconds, 1 minute) or a specific number of repetitions (e.g., 20, 30). Start with a duration or rep range that suits your fitness level and gradually increase as you build endurance.
Cool down and stretch:
After completing your desired duration or repetitions, gradually decrease your pace and allow your heart rate to return to normal. Finish with a cool-down period and perform gentle stretching exercises to help prevent muscle tightness and improve flexibility.
Remember to listen to your body, start at a pace that suits your fitness level, and gradually increase the intensity as you become more comfortable. If you have any underlying health conditions or concerns, consult with a healthcare professional before starting any new exercise routine.
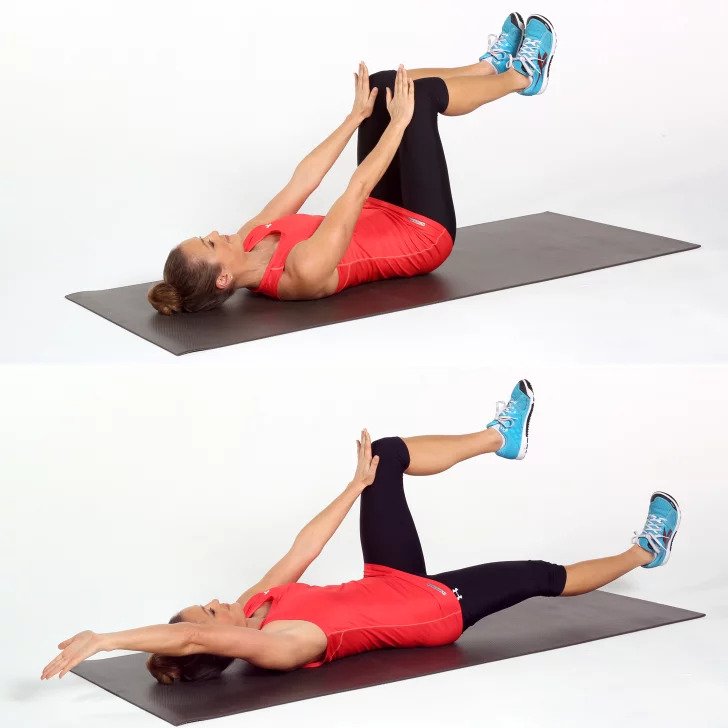
Dead Bug
The Dead Bug exercise is a core-strengthening exercise that targets the deep abdominal muscles, known as the transverse abdominis. It also engages other muscles of the core, including the rectus abdominis, obliques, and hip flexors. The exercise is named “Dead Bug” because of the position your body resembles when performing it.
Here’s a step-by-step guide on how to perform the Dead Bug exercise:
Start on your back:
Begin by lying flat on your back on an exercise mat or a comfortable surface. Extend your arms straight up toward the ceiling.
Lift your legs and bend your knees:
Bend your knees at a 90-degree angle, lifting your legs off the ground. Your shins should be parallel to the floor, and your knees should be positioned directly above your hips. This is your starting position.
Engage your core:
Activate your core muscles by gently pressing your lower back into the ground/mat. This helps maintain a stable and neutral spine throughout the exercise.
Extend your right leg and left arm:
While maintaining a stable core, slowly extend your right leg forward, straightening it as much as possible without letting it touch the ground. At the same time, reach your left arm backward, extending it fully overhead without allowing it to touch the ground. Keep your lower back pressed into the mat to prevent arching.
Return to the starting position:
Draw your right leg and left arm back to the starting position, bending your knee and bringing your arm straight up toward the ceiling. Keep your core engaged and maintain control throughout the movement.
Repeat with the opposite side:
Extend your left leg forward while simultaneously reaching your right arm overhead. Once again, focus on keeping your lower back pressed into the mat and maintaining stability.
Continue alternating sides:
Alternate extending the opposite leg and arm while keeping your core engaged and your lower back stable. Each extension and return to the starting position counts as one repetition.
Control your breathing:
Breath steadily and rhythmically throughout the exercise. Inhale as you prepare to extend your leg and arm, and exhale as you return to the starting position.
Aim for a specific number of repetitions:
Start with a manageable number of repetitions, such as 8-10, and gradually increase as you build strength and stability.
Maintain proper form:
Focus on maintaining proper form and control throughout the exercise. Avoid arching your lower back or allowing your legs to drop too low, as this can strain your lower back.
Remember to perform the exercise at a pace that suits your fitness level and listen to your body. If you experience any pain or discomfort, modify the range of motion or seek guidance from a fitness professional.
Jackknife
The Jackknife exercise is a challenging core exercise that primarily targets the abdominal muscles, particularly the rectus abdominis (the “six-pack” muscles), as well as the hip flexors. It requires control and stability throughout the movement.
The Jackknife exercise not only strengthens the abdominal muscles but also engages the hip flexors, which are responsible for lifting the legs and torso. It can help improve core stability, enhance abdominal definition, and contribute to overall core strength.
As with any exercise, it’s important to start with a level of difficulty that matches your fitness level and gradually progress as you become more comfortable and stronger.
Here’s a step-by-step guide on how to perform the jackknife exercise:
Start on your back:
Begin by lying flat on your back on an exercise mat or a comfortable surface. Extend your arms straight overhead and keep your legs fully extended.
Engage your core:
Activate your core muscles by gently pressing your lower back into the ground/mat. This helps maintain stability and protects your lower back during the exercise.
Lift your arms and legs:
Simultaneously lift your arms and legs off the ground, keeping them straight and extended. Imagine your body forming a “V” shape.
Reach for your toes:
As you lift your arms and legs, reach with your hands towards your toes. Imagine trying to touch your toes with your fingertips. This motion engages your abdominal muscles.
Maintain control and balance: While reaching for your toes, focus on maintaining control and balance throughout the exercise. Keep your core engaged to stabilize your body.
Slowly lower your arms and legs: Control the movement as you lower your arms and legs back down to the starting position, returning to lying flat on the ground. Avoid letting your arms and legs drop suddenly.
Repeat for desired repetitions or duration: Perform the jackknife exercise for a specific number of repetitions (e.g., 8-10 reps) or a duration (e.g., 30 seconds, 1 minute). Start with a challenge that is manageable for your fitness level and gradually increases as you become stronger.
Control your breathing:
Breathe steadily throughout the exercise. Inhale as you lift your arms and legs, and exhale as you lower them back down.
Maintain proper form:
Focus on maintaining proper form and technique. Avoid straining your neck or shoulders by keeping them relaxed. If you feel any discomfort or strain, modify the range of motion or seek guidance from a fitness professional.
Rest and repeat:
Once you’ve completed your desired number of repetitions or duration, rest briefly, and if desired, repeat the exercise for additional sets.
Remember to start with a pace and intensity that suits your fitness level and gradually increase as you become more comfortable and stronger. If you have any underlying health conditions or concerns, consult with a healthcare professional before starting any new exercise routine.
Scissor Switch
The scissor-switch exercise is a challenging core exercise that targets the abdominal muscles and hip flexors.
Here’s a step-by-step guide on how to perform the scissor-switch exercise:
Start lying on your back:
Begin by lying flat on your back on an exercise mat or a comfortable surface. Place your hands palms down underneath your glutes for added support.
Lift your legs off the ground:
Engage your core muscles and lift your legs off the ground, keeping them straight and extended. Your legs should be positioned vertically, perpendicular to the floor.
Begin the scissoring motion:
Open your legs laterally, lowering one leg toward the ground while keeping the other leg lifted vertically. The leg that is lowering should hover slightly above the ground without touching it.
Switch legs:
As the first leg lowers, simultaneously raise the other leg back to the vertical position. The legs should switch places, with the previously raised leg lowering and the previously lowered leg raising back up.
Continue alternating legs:
Continue the scissoring motion, alternating the position of your legs in a fluid and controlled manner. Focus on engaging your abdominal muscles and maintaining a steady pace.
Maintain control and stability:
Throughout the exercise, aim to maintain control and stability in your movements. Avoid any jerking or swinging motions and focus on engaging your core muscles to perform the exercise with proper form.
Breathe steadily:
Remember to breathe steadily throughout the exercise. Inhale and exhale rhythmically, maintaining a controlled and consistent breathing pattern.
Aim for a specific number of repetitions or duration:
Perform the scissor-switch exercise for a specific number of repetitions (e.g., 8-10 reps) or a duration (e.g., 30 seconds, 1 minute). Start with a challenge that is manageable for your fitness level and gradually increases as you become stronger.
Rest and repeat:
Once you’ve completed your desired number of repetitions or duration, rest briefly and, if desired, repeat the exercise for additional sets.
Remember to listen to your body, maintain proper form, and adjust the intensity as needed. If you experience any pain or discomfort, modify the range of motion or seek guidance from a fitness professional.
Plank Jack
The Plank Jack is a challenging exercise that targets your core muscles, as well as your shoulders, arms, and legs.
Here’s how you can perform a Plank Jack:
Starting Position:
Begin in a high plank position with your hands directly under your shoulders and your body forming a straight line from head to heels. Your feet should be together.
Engage your core:
Tighten your abdominal muscles to stabilize your body and maintain a neutral spine throughout the exercise.
Jump outwards:
In one fluid motion, jump both of your feet out wide to the sides, similar to a jumping jack motion. Keep your upper body stable and avoid lifting your hips too high.
Jump back in:
Quickly jump your feet back to the starting position, returning to the high plank. Keep your movements controlled and maintain proper form.
Repeat:
Continue performing the plank jacks for your desired number of repetitions or for a specific duration of time. Aim for a challenging yet manageable pace.
Important tips:
- Keep your core engaged and maintain a straight line from head to heels throughout the exercise.
- Avoid sagging your hips or lifting them too high. Your body should remain in a plank position.
- Perform the exercise on a non-slip surface and wear appropriate footwear if necessary.
- If you have any existing shoulder, wrist, or lower back issues, it’s best to consult with a healthcare professional before attempting this exercise.
Remember, proper form and technique are essential to avoid injury and maximize the benefits of the exercise. If you’re new to Plank Jacks, start with a few repetitions and gradually increase the intensity and duration as you become more comfortable and stronger.
Reverse Crunch
The Reverse Crunch is an abdominal exercise that primarily targets the lower ab.

Here’s a step-by-step guide on how to perform the Reverse Crunch:
Starting Position:
Lie flat on your back on an exercise mat or the floor. Extend your legs fully and place your arms by your sides, palms facing down. This is your starting position.
Engage your core:
Press your lower back into the mat or floor to engage your core muscles. This will help maintain stability throughout the exercise.
Lift your legs:
Bend your knees and lift your feet off the ground. Your thighs should be perpendicular to the floor, with your lower legs parallel to it. This is the initial position for the reverse crunch.
Contract your ab:
Slowly contract your abdominal muscles to curl your hips off the floor, bringing your knees towards your chest. Focus on using your ab to initiate the movement rather than swinging your legs.
Lift your hips:
As you continue to curl your knees towards your chest, simultaneously lift your hips off the floor. Your lower back should be slightly off the ground at the top of the movement.
Hold and squeeze:
Pause for a second at the top of the movement, squeezing your ab to maximize the contraction.
Lower your legs:
Slowly lower your legs back to the starting position, allowing your lower back to touch the floor or mat. Keep your core engaged throughout the lowering phase.
Repeat:
Complete the desired number of repetitions, aiming for a controlled and steady pace. Focus on maintaining proper form and engaging your ab throughout the exercise.
Important tips:
- Avoid using momentum or swinging your legs to perform the reverse crunch. The movement should be controlled and deliberate, focusing on engaging your ab.
- Keep your lower back pressed against the mat or floor throughout the exercise to minimize strain on your spine.
- If you find it difficult to keep your legs straight, you can modify the exercise by keeping your knees slightly bent.
- As with any exercise, it’s important to listen to your body and work within your own comfort level. If you experience any pain or discomfort, stop the exercise and consult with a healthcare professional.
Incorporate the Reverse Crunch into your regular abdominal workout routine to strengthen your lower ab and improve core stability.
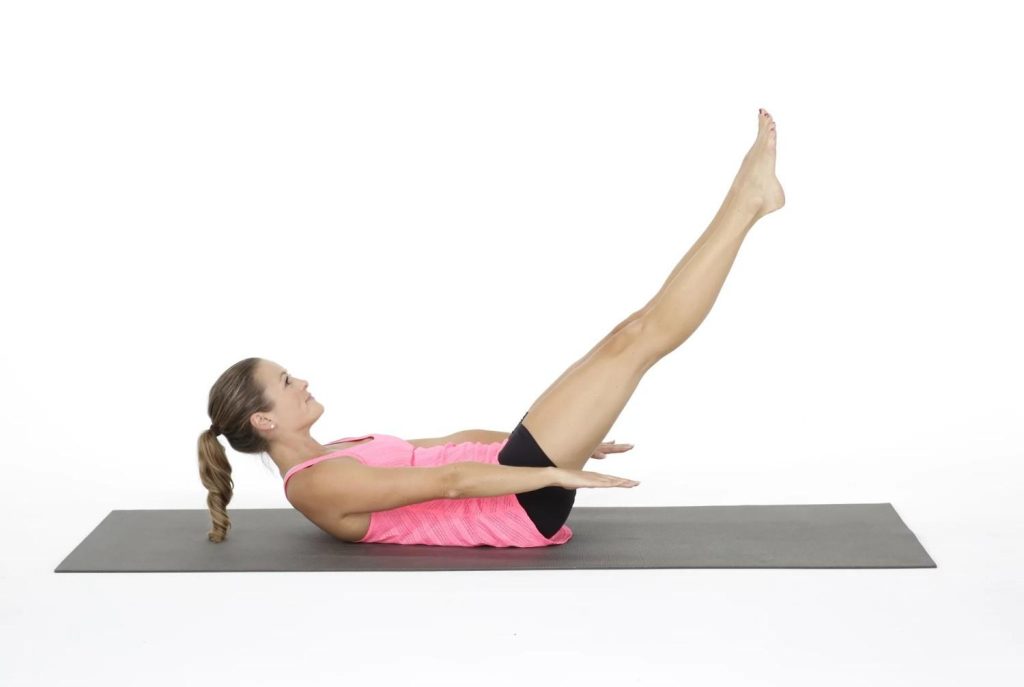
Pilates 100
The Pilates 100 is a classic exercise in Pilates that focuses on strengthening your core and building endurance.
Here’s a step-by-step guide on how to perform the Pilates 100:
Starting Position:
Lie flat on your back on an exercise mat or the floor. Bend your knees and place your feet flat on the ground. Your arms should be long by your sides, palms facing down.
Engage your core:
Press your lower back into the mat or floor and engage your abdominal muscles to stabilize your spine.
Lift your head and shoulders:
Gently lift your head, neck, and shoulders off the mat, maintaining a slight chin tuck. Keep your gaze toward your abdominals and avoid straining your neck.
Lift your legs:
Simultaneously lift both legs off the ground, extending them straight up towards the ceiling. Your legs should be at a 45-degree angle or higher, depending on your comfort level and flexibility.
Begin the arm pumps:
Extend your arms straight forward, parallel to the floor. Palms should face each other, and fingers should be reaching long. Engage your shoulder blades by drawing them down your back.
Pump your arms:
Start pumping your arms up and down by your sides, with small, quick movements. Inhale for five-arm pumps and exhale for five-arm pumps. This completes one set of 10-arm pumps.
Continue for 10 sets:
Keep pumping your arms vigorously for a total of 10 sets, reaching a count of 100 arm pumps in total. Focus on maintaining control, engaging your core, and breathing deeply throughout the exercise.
Lower your legs and head:
After completing the 100 arm pumps, gently lower your legs back down to the starting position, keeping them engaged and controlled. Then, lower your head, neck, and shoulders back to the mat.
Important tips:
- Maintain proper form and control throughout the exercise. Avoid using momentum or straining your neck and lower back.
- Focus on your breath. Inhale deeply through your nose for five arm pumps and exhale fully through your mouth for the next five arm pumps.
- Modify as needed. If you find it challenging to lift both legs straight up, you can keep your knees bent or perform the exercise with one leg at a time.
- Start with fewer arm pumps or sets if you’re a beginner, and gradually increase the intensity and number of arm pumps as you build strength and endurance.
The Pilates 100 is an effective exercise to activate your deep abdominal muscles, improve core strength, and promote overall stability. Incorporate it into your Pilates or core workout routine, and remember to listen to your body and work within your own capabilities.
Core Roll Up
The Core Roll Up is a fundamental exercise in Pilates that targets your core muscles, particularly the abdominal muscles.
Here’s a step-by-step guide on how to perform the Core Roll Up:
Starting Position:
Begin by lying flat on your back on an exercise mat or the floor. Extend your legs fully and place your arms overhead, reaching them towards the ceiling. Your palms should be facing each other.
Engage your core:
Press your lower back into the mat or floor and engage your abdominal muscles to stabilize your spine. This will help maintain proper alignment throughout the exercise.
Initiate the movement:
Inhale deeply, and as you exhale, begin to slowly curl your upper body off the mat or floor, one vertebra at a time. Imagine peeling your spine off the mat, starting from your head, then your neck, upper back, and so on.
Roll up:
Continue the controlled movement as you roll your body up, reaching forward with your arms. Keep your abdominals engaged and maintain a rounded shape with your spine as you come up to a seated position.
Forward reach:
At the top of the movement, when you’re sitting up tall, reach your arms forward, extending them parallel to the floor. Keep your shoulders relaxed and away from your ears.
Reverse the movement:
Inhale deeply, and as you exhale, reverse the movement by slowly rolling your body back down to the mat or floor. Articulate your spine one vertebra at a time, allowing your lower back, mid-back, and then your upper back and head to touch the ground sequentially.
Repeat:
Complete the desired number of repetitions, aiming for a controlled and smooth motion. Focus on engaging your core and maintaining proper alignment throughout the exercise.
Important tips:
- Maintain control and avoid using momentum to roll up or down. The movement should be slow and deliberate, with a focus on engaging your core muscles.
- Keep your neck relaxed and avoid straining it during the exercise. Imagine lengthening the back of your neck as you perform the movement.
- If you have tight hamstrings or limited flexibility, you can bend your knees slightly or place a small pillow or towel under your knees to provide support during the exercise.
- It’s important to listen to your body and work within your own comfort level. If you experience any pain or discomfort, stop the exercise and consult with a healthcare professional.
Incorporate the Core Roll Up into your Pilates or core workout routine to strengthen your abdominal muscles and improve spinal mobility. Start with a few repetitions and gradually increase the intensity and number of repetitions as you become more comfortable and stronger.
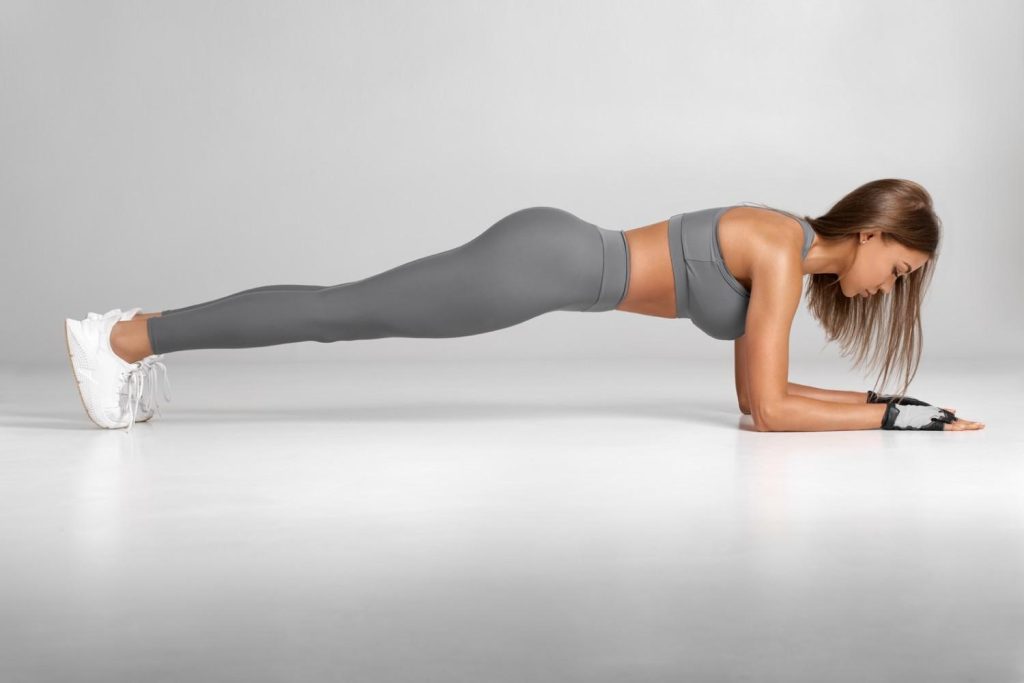
Body Saw
The Body Saw is an advanced core exercise that challenges your stability, strength, and control.
Here’s a step-by-step guide on how to perform the Body Saw:
Starting Position:
Begin in a forearm plank position with your forearms resting on the ground, and elbows directly under your shoulders. Your body should be in a straight line from head to heels, and your toes should be tucked under, supporting your lower body.
Engage your core:
Tighten your abdominal muscles to stabilize your body and maintain a neutral spine throughout the exercise. This will help maintain proper form and prevent excessive movement.
Rock forward:
Slowly shift your weight forward by using your forearms and toes, creating a rocking motion. You want to move your body forward without allowing your hips to sag or your lower back to arch.
Rock backward:
Once you’ve reached the furthest point forward, reverse the movement by shifting your weight backward, moving your body in the opposite direction. Again, maintain a straight line from head to heels and avoid excessive movement in your hips or lower back.
Repeat:
Continue rocking forward and backward for your desired number of repetitions or for a specific duration of time. Aim for a controlled and smooth motion, focusing on engaging your core muscles throughout the exercise.
Important tips:
- Maintain proper form and alignment throughout the exercise. Your body should stay in a straight line, and your core should remain engaged to stabilize your spine.
- Avoid lifting or sagging your hips. Focus on using your core muscles to control the movement and maintain stability.
- Start with small movements and gradually increase the range of motion as you become more comfortable and stronger.
- If you have any existing shoulder, wrist, or lower back issues, it’s best to consult with a healthcare professional before attempting this exercise.
This exercise requires a certain level of core strength and stability. If you’re new to core training or find it challenging, it’s recommended to build a foundation with basic plank exercises before attempting the Body Saw.
Incorporate the Body Saw into your core workout routine to challenge your stability and strengthen your core muscles. Remember to start slowly and progress gradually as you build strength and control.
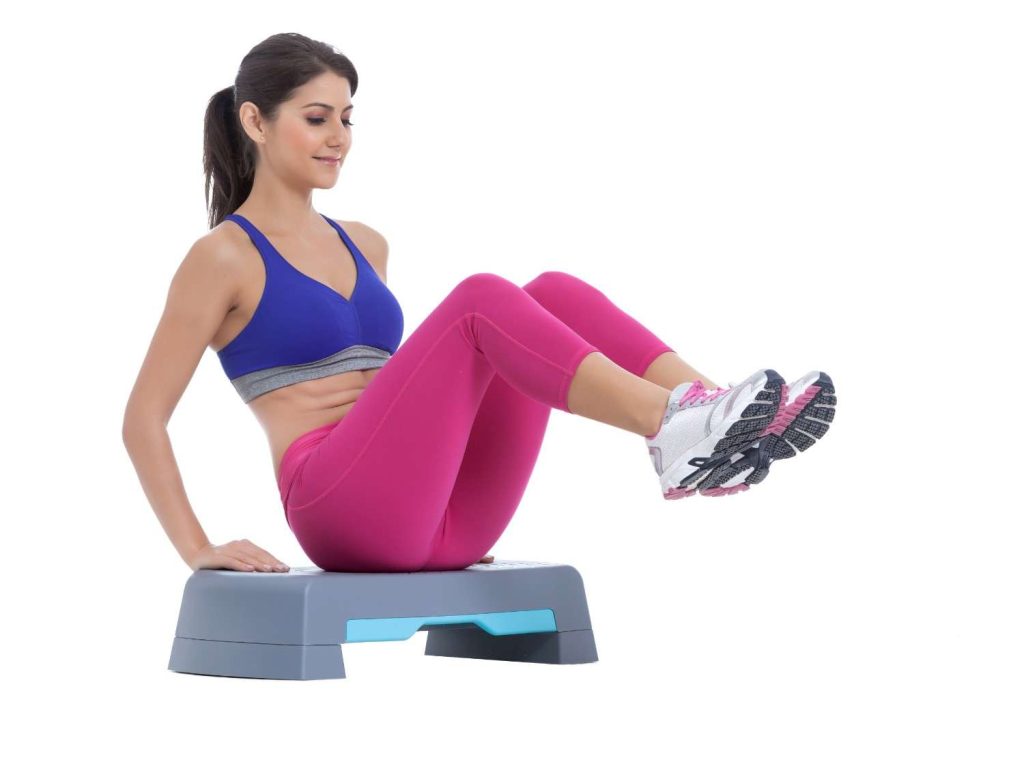
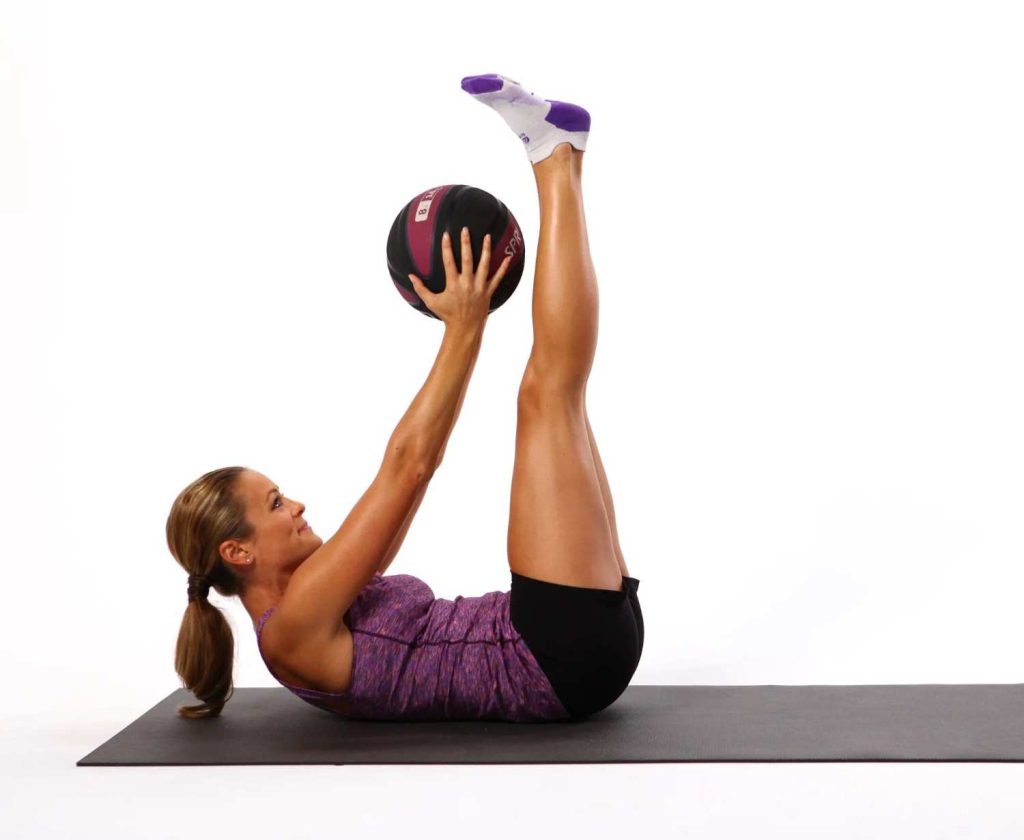
Medicine Ball Seated Knee Tuck
The Medicine Ball Seated Knee Tuck is a challenging exercise that targets the abdominal muscles, especially the lower ab.

Here’s a step-by-step guide on how to perform the Medicine Ball Seated Knee Tuck:
Starting Position:
Sit on the floor with your knees bent and feet flat on the ground. Hold a medicine ball with both hands, keeping it close to your chest. Lean back slightly, maintaining a strong and engaged core.
Engage your core:
Begin by tightening your abdominal muscles and bracing your core. This will help stabilize your body throughout the exercise.
Lift your feet:
Lift both feet off the ground, bringing your knees towards your chest. Maintain a 90-degree angle at your hips and knees. This is your starting position.
Extend your legs:
Slowly extend your legs straight out in front of you while simultaneously leaning back slightly. Your upper body and the medicine ball should move backward as your legs extend forward. Maintain control and engage your ab to prevent swinging or momentum.
Tuck your knees:
Use your abdominal muscles to pull your knees back in towards your chest, returning to the starting position. Keep your movements controlled and avoid dropping your feet to the ground.
Repeat:
Perform the exercise for your desired number of repetitions or for a specific duration of time. Aim for a challenging yet manageable pace.
Important tips:
- Maintain proper form and technique throughout the exercise. Keep your core engaged and avoid rounding your back or straining your neck.
- Use a medicine ball that is appropriate for your fitness level and allows you to maintain control and stability throughout the exercise.
- Focus on using your abdominal muscles to initiate the movement and control the knee tuck.
- Keep your breathing steady and exhale as you tuck your knees towards your chest and inhale as you extend your legs.
- If you have any existing lower back issues or discomfort, it’s best to consult with a healthcare professional before attempting this exercise.
Incorporate the Medicine Ball Seated Knee Tuck into your core workout routine to strengthen your abdominal muscles, particularly the lower ab. Start with a few repetitions and gradually increase the intensity and number of repetitions as you become more comfortable and stronger.
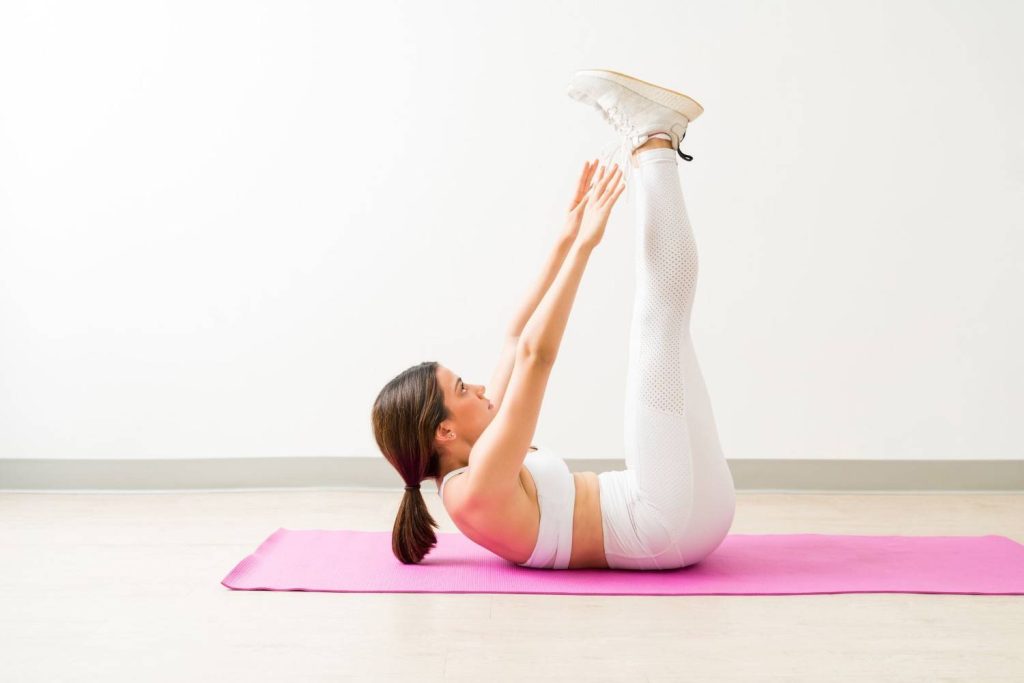
Medicine Ball V-Up
The Medicine Ball V-Up is an advanced exercise that targets the abdominal muscles, including the rectus abdominis and the hip flexors.
Here’s a step-by-step guide on how to perform the Medicine Ball V-Up:
Starting Position:
Lie flat on your back on an exercise mat or the floor. Hold a medicine ball with both hands, extending your arms overhead. Keep your legs extended and your feet together.
Engage your core:
Activate your abdominal muscles by pressing your lower back into the mat or floor. This will help stabilize your spine throughout the exercise.
Lift your upper body and legs:
Simultaneously lift your upper body and legs off the ground while keeping them straight. At the same time, bring the medicine ball toward your feet, reaching toward your toes.
Form a V shape:
Continue lifting until your body forms a V shape, with your torso and legs forming a diagonal line. Your arms should be extended towards your feet, holding the medicine ball.
Pause and squeeze:
Hold the V position for a moment at the top, focusing on contracting your abdominal muscles. This maximizes the engagement of your core.
Lower your body:
Slowly lower your upper body and legs back to the starting position, keeping them under control and maintaining tension in your ab.
Repeat:
Perform the exercise for your desired number of repetitions, aiming for a controlled and smooth motion. Focus on engaging your core and maintaining proper form throughout the exercise.
Important tips:
- Maintain control and avoid using momentum to lift your body and the medicine ball. The movement should be deliberate and controlled, focusing on engaging your core muscles.
- Keep your neck relaxed and avoid straining it during the exercise. Imagine lengthening the back of your neck as you perform the movement.
- If you find it challenging to lift both your upper body and legs simultaneously, you can modify the exercise by performing a variation where you lift only your upper body or only your legs at a time.
- Use a medicine ball that is appropriate for your fitness level and allows you to maintain control and stability throughout the exercise.
- It’s important to listen to your body and work within your own comfort level. If you experience any pain or discomfort, stop the exercise and consult with a healthcare professional.
Incorporate the Medicine Ball V-Up into your core workout routine to strengthen your abdominal muscles and improve core stability. Start with a few repetitions and gradually increase the intensity and number of repetitions as you become more comfortable and stronger.
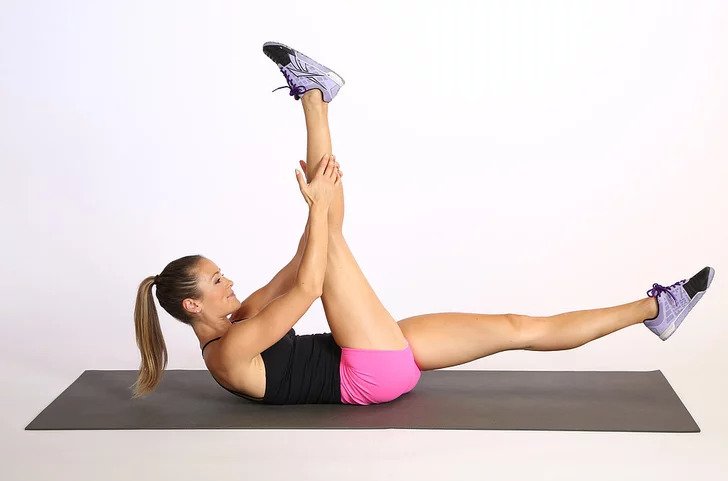
Scissor Kick
The Scissor Kick is a challenging exercise that primarily targets the abdominal muscles, particularly the lower ab, while also engaging the hip flexors.

Here’s a step-by-step guide on how to perform the Scissor Kick:
Starting Position:
Lie flat on your back on an exercise mat or the floor. Place your hands alongside your body, palms facing down. Keep your legs extended and together.
Engage your core:
Press your lower back into the mat or floor and engage your abdominal muscles to stabilize your spine. This will help maintain proper form and prevent excessive arching of the lower back.
Lift your legs:
Simultaneously lift both legs a few inches off the ground, keeping them straight and close together. This is your starting position.
Scissor motion:
Begin the exercise by crossing one leg over the other in a scissor-like motion. Keep your legs as straight as possible throughout the movement. As one leg moves up, the other leg moves down, crossing over it.
Alternate legs:
Continue alternating the scissor motion of your legs, with one leg moving up while the other leg moves down. Maintain a controlled and rhythmic movement.
Engage your ab:
Focus on engaging your abdominal muscles throughout the exercise, imagining pulling your belly button towards your spine. This will help maximize the activation of your core.
Repeat:
Perform the exercise for your desired number of repetitions or for a specific duration of time. Aim for a controlled and smooth motion, focusing on engaging your core and maintaining proper form.
Important tips:
- Maintain control and avoid using momentum to swing your legs. Focus on using your abdominal muscles to control the movement.
- Keep your neck relaxed and avoid straining it during the exercise. Rest your head comfortably on the mat or floor.
- If you find it challenging to keep your legs straight, you can slightly bend your knees or perform the exercise with smaller scissor motions until you build the necessary strength and flexibility.
- Breathe naturally throughout the exercise, inhaling and exhaling as you find comfortable.
- If you have any existing lower back issues or discomfort, it’s best to consult with a healthcare professional before attempting this exercise.
Incorporate the Scissor Kick into your core workout routine to strengthen your abdominal muscles, particularly the lower ab. Start with a few repetitions and gradually increase the intensity and number of repetitions as you become more comfortable and stronger.
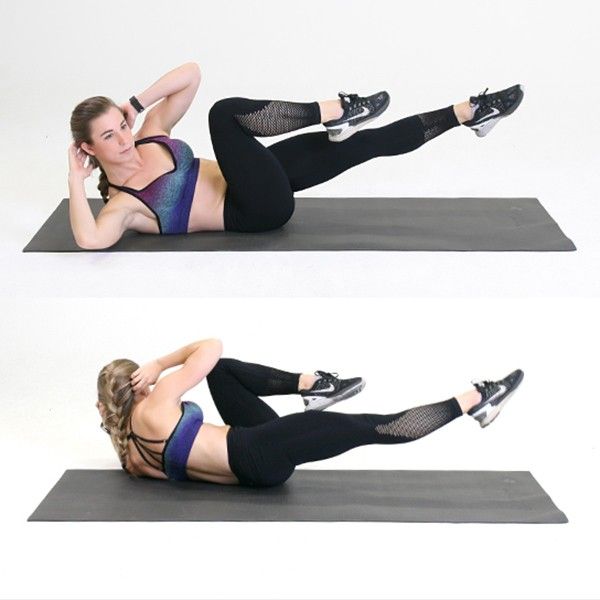
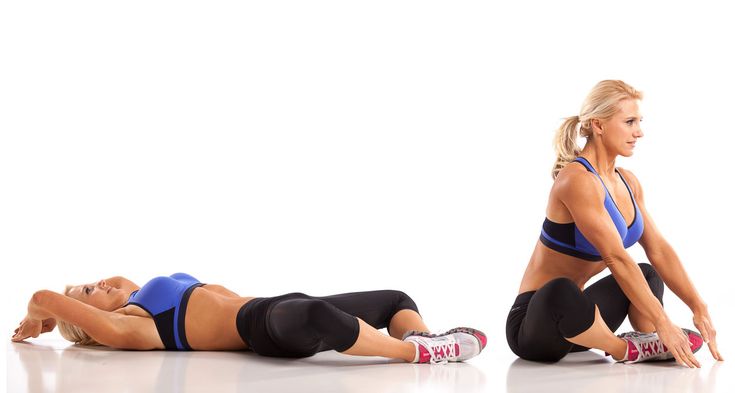
Butterfly Sit-Up
The Butterfly Sit-Up is an exercise that targets the abdominal muscles, especially the upper and lower ab.
Here’s a step-by-step guide on how to perform the Butterfly Sit-Up:
Starting Position:
Sit on an exercise mat or the floor with your knees bent and the soles of your feet touching each other, forming a diamond shape with your legs. Place your hands behind your head, elbows pointing out to the sides.
Engage your core:
Tighten your abdominal muscles and brace your core. This will help stabilize your spine throughout the exercise.
Lower your upper body:
Slowly lean back while maintaining a straight spine until your shoulder blades touch the mat or floor. Keep your chest lifted and your head in line with your spine.
Sit up:
Engage your abdominal muscles and use them to lift your upper body off the mat or floor. Curl forward, bringing your chest towards your knees. Keep your elbows wide and open, avoiding pulling on your neck with your hands.
Reach forward:
At the top of the movement, reach forward with your arms, extending them toward your feet. Your fingertips should aim to touch or reach beyond your toes.
Lower back down:
Slowly lower your upper body back down to the starting position, maintaining control and engaging your core muscles.
Repeat:
Perform the exercise for your desired number of repetitions, focusing on a controlled and smooth motion. Engage your core throughout the exercise and maintain proper form.
Important tips:
- Avoid pulling on your neck or using your hands to lift your upper body. The movement should be initiated and controlled by your abdominal muscles.
- Keep your feet pressed together throughout the exercise. This helps engage the inner thighs and maintains stability.
- Maintain a steady breathing pattern, exhaling as you sit up and inhaling as you lower back down.
- If you have any existing neck or lower back issues or discomfort, it’s best to consult with a healthcare professional before attempting this exercise.
- If you find it challenging to lift your upper body all the way up, you can modify the exercise by performing partial sit-ups or reducing the range of motion until you build strength and flexibility.
Incorporate the Butterfly Sit-Up into your core workout routine to strengthen your abdominal muscles, particularly the upper and lower ab. Start with a few repetitions and gradually increase the intensity and number of repetitions as you become more comfortable and stronger.
Toe Touch
The Toe Touch exercise is a dynamic movement that primarily targets the abdominal muscles, particularly the upper ab, while also engaging the hip flexors and hamstrings.
Here’s a step-by-step guide on how to perform the Toe Touch:
Starting Position:
Stand tall with your feet hip-width apart, arms extended alongside your body, and palms facing inward.
Engage your core:
Tighten your abdominal muscles and brace your core. This will help stabilize your spine and maintain proper form throughout the exercise.
Bend forward:
Begin the movement by hinging at your hips and bending forward. Keep your back straight and chest lifted as you lower your torso toward the ground.
Reach for your toes:
As you bend forward, reach your hands toward your toes, aiming to touch or grasp them. Keep your arms straight and extend them as far as you can comfortably reach.
Engage your ab:
At the bottom of the movement, engage your abdominal muscles and contract your upper ab. This will help intensify the activation of your core.
Return to starting position:
Slowly reverse the movement by lifting your torso back up, maintaining control, and engaging your core. Keep your back straight as you return to the standing position.
Repeat:
Perform the exercise for your desired number of repetitions, aiming for a controlled and smooth motion. Focus on engaging your core and maintaining proper form throughout the exercise.
Important tips:
- Avoid rounding your back or straining your neck during the exercise. Keep your spine straight and your head aligned with your spine.
- Keep a slight bend in your knees throughout the movement to avoid excessive strain on your hamstrings.
- If you’re unable to touch your toes, reach as far as you can comfortably. Over time, you can work on increasing your flexibility and range of motion.
- Breathe naturally throughout the exercise, exhaling as you bend forward and inhaling as you return to the starting position.
- If you have any existing lower back issues or discomfort, it’s best to consult with a healthcare professional before attempting this exercise.
Incorporate the Toe Touch into your core workout routine to strengthen your abdominal muscles, particularly the upper ab. Start with a few repetitions and gradually increase the intensity and number of repetitions as you become more comfortable and stronger.
Hanging Leg Raise
The Hanging Leg Raise is an advanced exercise that targets the lower abdominal muscles, hip flexors, and the muscles of the upper body.

Here’s a step-by-step guide on how to perform the Hanging Leg Raise:
Find a stable bar:
Locate a sturdy pull-up bar or a set of parallel bars at a height that allows you to hang freely without touching the ground. Grip the bar with an overhand grip, hands slightly wider than shoulder-width apart.
Hang with engaged shoulders:
Start by hanging from the bar with your arms fully extended. Engage your shoulder blades by pulling them down and back. This helps stabilize your upper body and protect your shoulders.
Engage your core:
Tighten your abdominal muscles and brace your core. This will help stabilize your spine and maintain proper form throughout the exercise.
Lift your legs:
Keeping your legs straight, exhale and use your abdominal muscles to lift your legs. Aim to bring them up until they are parallel to the floor or higher. Focus on using your lower ab to initiate the movement.
Pause and squeeze:
At the top of the movement, pause for a moment and squeeze your lower ab. This maximizes the activation of your core.
Lower your legs:
In a controlled manner, lower your legs back down to the starting position, avoiding swinging or using momentum. Keep your core engaged and maintain control throughout the descent.
Repeat:
Perform the exercise for your desired number of repetitions, aiming for a controlled and smooth motion. Focus on engaging your core and maintaining proper form throughout the exercise.
Important tips:
- Maintain a controlled rhythm throughout the exercise and avoid swinging your body. Focus on using your core muscles to control the movement.
- Keep your legs straight throughout the exercise. Avoid bending at the knees or using momentum to lift your legs.
- Keep your neck relaxed and avoid straining it during the exercise. Look straight ahead or slightly upward to maintain proper alignment.
- If you have any existing shoulder or lower back issues, it’s best to consult with a healthcare professional before attempting this exercise.
If you’re unable to perform full hanging leg raises, you can start with bent knee raises or knee tucks and gradually work your way up to straight leg raises.
Incorporate the Hanging Leg Raise into your core workout routine to strengthen your lower abdominal muscles and improve core stability. Start with a few repetitions and gradually increase the intensity and number of repetitions as you become more comfortable and stronger.
Leg Raise
The Leg Raise is an effective exercise for targeting the lower abdominal muscles.

Here’s a step-by-step guide on how to perform the Leg Raise:
Starting Position:
Lie flat on your back on an exercise mat or the floor. Place your hands by your sides or underneath your glutes for support. Keep your legs extended and together, and your feet pointed upward.
Engage your core:
Tighten your abdominal muscles and brace your core. This will help stabilize your spine throughout the exercise.
Lift your legs:
Keeping your legs straight, exhale and use your lower abdominal muscles to lift your legs off the ground. Lift them as high as you can while maintaining control and without straining your lower back.
Pause and squeeze:
At the top of the movement, pause for a moment and squeeze your lower ab. This maximizes the activation of your core.
Lower your legs:
In a controlled manner, lower your legs back down to the starting position. Keep your core engaged and maintain control throughout the descent.
Repeat:
Perform the exercise for your desired number of repetitions, focusing on a controlled and smooth motion. Engage your core throughout the exercise and maintain proper form.
Important tips:
- Maintain control throughout the exercise and avoid swinging your legs. Focus on using your core muscles to control the movement.
- Keep your lower back pressed into the mat or floor throughout the exercise. Avoid arching or lifting your hips off the ground.
- Keep your legs straight throughout the exercise. Avoid bending at the knees or using momentum to lift your legs.
- If you have any existing lower back issues or discomfort, it’s best to consult with a healthcare professional before attempting this exercise.
- If lifting both legs simultaneously is challenging, you can modify the exercise by bending your knees and performing bent knee raises. This reduces the leverage and intensity of the exercise.
Breathe naturally throughout the exercise, exhaling as you lift your legs and inhaling as you lower them.
Incorporate the Leg Raise into your core workout routine to strengthen your lower abdominal muscles and improve core stability. Start with a few repetitions and gradually increase the intensity and number of repetitions as you become more comfortable and stronger.
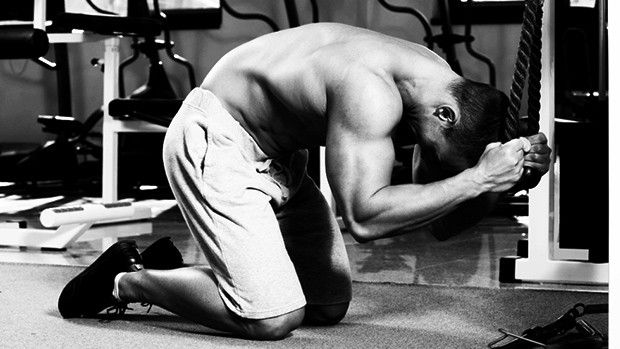
Kneeling Cable Crunch
The Kneeling Cable Crunch is an effective exercise for targeting the abdominal muscles, particularly the rectus abdominis. It utilizes a cable machine to provide resistance.
Here’s a step-by-step guide on how to perform the Kneeling Cable Crunch:
Set up the cable machine:
Start by attaching a rope handle or a straight bar attachment to the high pulley of a cable machine. Adjust the weight stack to a challenging but manageable weight.
Kneeling position:
Position yourself facing away from the cable machine and kneel down on an exercise mat or the floor. Your knees should be hip-width apart, and your feet should be secured under a foot anchor or held down by a partner.
Grab the handle:
Reach overhead and grasp the rope handle or the straight bar attachment with both hands, shoulder-width apart. Your palms should be facing downward.
Engage your core:
Tighten your abdominal muscles and brace your core. This will help stabilize your spine throughout the exercise.
Crunch forward:
Begin the movement by flexing your spine and bending forward at the waist. As you crunch forward, bring your elbows down towards your thighs, aiming to bring your elbows and knees as close together as possible.
Squeeze your ab:
At the bottom of the movement, pause and squeeze your abdominal muscles, focusing on the contraction in your ab.
Return to starting position:
Slowly and controlled extend your spine to return to the starting position. Allow your upper body to move back to an upright position while maintaining tension in your ab.
Repeat: Perform the exercise for your desired number of repetitions, focusing on a controlled and smooth motion. Engage your core throughout the exercise and maintain proper form.
Important tips:
- Focus on using your abdominal muscles to initiate and control the movement, rather than relying on the strength of your arms or shoulders.
- Keep your back straight and avoid rounding or arching your spine during the movement. Maintain a neutral spine position.
- Breathe naturally throughout the exercise, exhaling as you crunch forward and inhaling as you return to the starting position.
- If you have any existing lower back issues or discomfort, it’s best to consult with a healthcare professional before attempting this exercise.
- Start with a weight that allows you to maintain proper form and control. Gradually increase the weight as you become more comfortable and stronger.
Incorporate the Kneeling Cable Crunch into your core workout routine to strengthen your abdominal muscles, particularly the rectus abdominis. Start with a few repetitions and gradually increase the intensity and number of repetitions as you become more comfortable and stronger.
The Bottom Line of Lower Ab Workout
The lower ab, or lower abdominal muscles, are an important part of the core muscles in the human body. They play a crucial role in stabilizing the pelvis and lower back, as well as assisting with various movements involving the hips and legs. However, achieving a well-defined and toned lower ab region can be challenging for many people, as it tends to be a common problem area where excess fat is stored.
To effectively target and strengthen the lower ab, it’s important to engage in a combination of cardiovascular exercise, strength training, and maintaining a healthy diet.
Remember that spot reduction, or losing fat in specific areas of the body, is not possible. To reveal your lower ab, it’s important to reduce overall body fat through a combination of exercise and a healthy diet. Consistency and patience are key, as achieving visible results can take time and vary depending on individual factors such as genetics and body composition.